Southern Blotting: A Definitive Guide to DNA Sequence Detection for Biomedical Research
This article provides a comprehensive resource for researchers and drug development professionals on Southern blotting, a foundational technique for specific DNA sequence detection.
Southern Blotting: A Definitive Guide to DNA Sequence Detection for Biomedical Research
Abstract
This article provides a comprehensive resource for researchers and drug development professionals on Southern blotting, a foundational technique for specific DNA sequence detection. It covers core principles and the historical context of the method, details a step-by-step modern workflow including non-radioactive detection, and offers practical troubleshooting and optimization strategies. The content also validates the technique's ongoing relevance through a comparative analysis with PCR and next-generation sequencing, highlighting its critical applications in clinical diagnostics, genotyping, and cell line characterization.
The Foundation of Southern Blotting: Principles, History, and Core Concepts
Southern blotting, a seminal technique developed by Edwin Southern in 1975, revolutionized molecular biology by enabling specific detection of DNA sequences within complex samples. This method, which involves the transfer of electrophoretically separated DNA fragments to a membrane for hybridization with a labeled probe, remains a foundational procedure for analyzing gene structure, copy number, and organization. While newer technologies like PCR and next-generation sequencing have replaced it for many routine applications, Southern blotting retains unique utility for characterizing large genomic rearrangements and determining methylation status. This application note details the fundamental principles, provides optimized protocols, and contextualizes the ongoing relevance of Southern blotting in modern genomic research.
Southern blotting is a versatile molecular biology technique designed for the detection of specific DNA sequences within DNA samples. The method was invented by the British biologist Edwin Southern in 1975, from whom it derives its name [1] [2]. The core principle involves the identification of specific DNA fragments through hybridization—the process where complementary nucleotide sequences pair to form double-stranded molecules. This is achieved by using a labeled DNA probe that seeks out and binds to its complementary sequence on a membrane containing the target DNA fragments [1] [2].
The significance of Southern blotting lies in its ability to provide information not readily obtainable through other methods. It can determine the number of copies of a particular gene present in a genome, detect gene rearrangements, and identify specific DNA fragments for cloning purposes [2]. Although the technique has been largely superseded by PCR-based methods for many routine applications in clinical settings like the NHS Genomic Medicine Service, it retains important niche applications, particularly for diagnosing conditions caused by large expansions of tandemly repeated DNA sequences and for determining DNA methylation status [3].
The technique's name inspired a geographical naming convention for similar blotting methods: Northern blotting for RNA detection, Western blotting for protein detection, and even Southwestern blotting for DNA-protein interactions [2] [4].
Fundamental Methodology
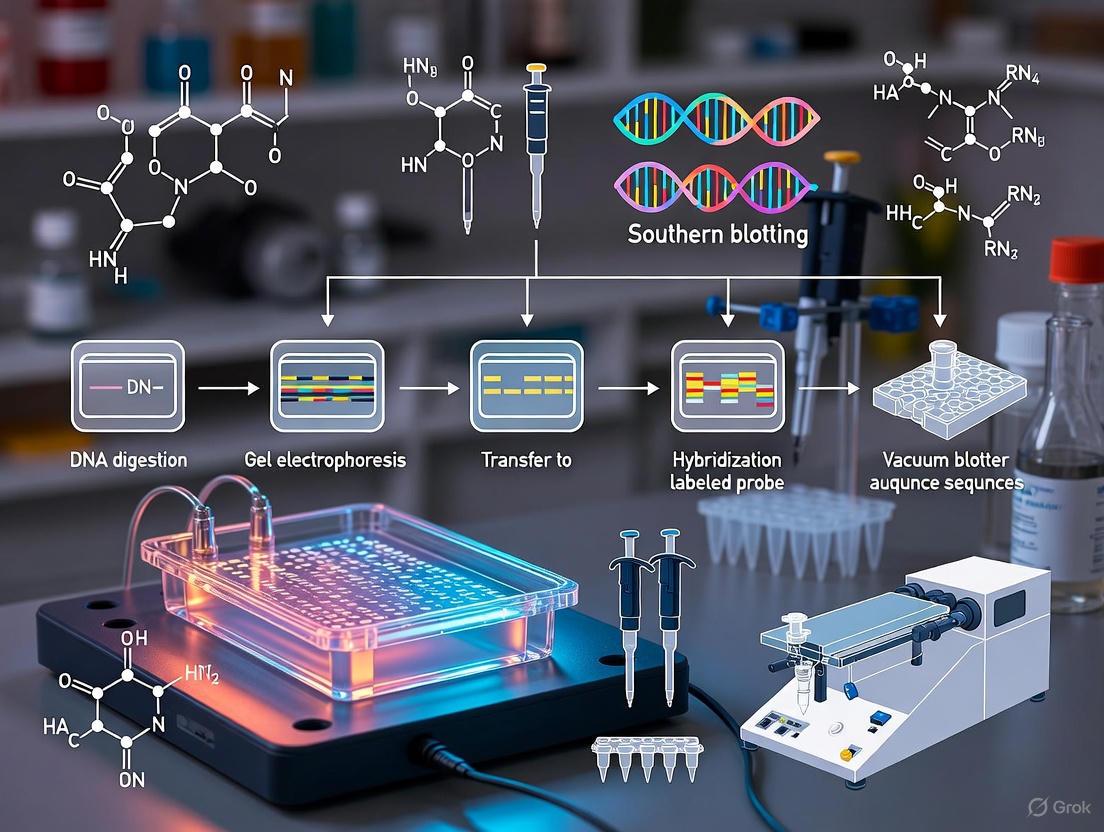
The Southern blotting procedure consists of several sequential steps, each critical to the success of the experiment.
The diagram below illustrates the comprehensive Southern blotting workflow:
Key Procedural Steps
DNA Preparation and Digestion
The process begins with the extraction of high-quality genomic DNA from biological samples (tissues, cells, or blood). For complex genomic DNA, typically 5-10μg is required to ensure adequate signal detection [5]. The DNA is then digested into smaller fragments using restriction endonucleases, with complete digestion being crucial to avoid ambiguous results. For genomic DNA, digestion often requires an excess of enzyme (5-10×) and incubation overnight to ensure complete fragmentation [5] [4].
Gel Electrophoresis and Transfer
The digested DNA fragments are separated by size using agarose gel electrophoresis (typically 0.8%-1.0% agarose), which allows visualization of the fragmentation pattern [1] [6]. Following separation, the DNA is denatured into single strands using alkaline treatment, making it accessible for hybridization [6] [4]. The DNA fragments are then transferred from the gel onto a solid membrane (nitrocellulose or nylon) using capillary action, vacuum, or electrophoretic transfer [1] [6]. Capillary transfer, the original method, uses a stack of dry absorbent paper to draw transfer buffer through the gel and membrane, depositing the DNA onto the membrane surface [6] [5].
Hybridization and Detection
The membrane-bound DNA is fixed through baking or UV crosslinking, then incubated with a prehybridization solution containing blocking agents (such as Denhardt's solution or salmon sperm DNA) to minimize nonspecific probe binding [6] [4]. A labeled probe—complementary to the target sequence—is then hybridized to the membrane under controlled conditions. After hybridization, stringent washing removes non-specifically bound probes, and the specifically bound probe is detected through methods appropriate to its label (autoradiography for radioactive probes, chemiluminescence or colorimetry for non-radioactive alternatives) [1] [6].
Essential Research Reagents and Materials
Successful Southern blotting requires carefully selected reagents and materials, each serving specific functions in the experimental workflow.
Table 1: Essential Research Reagent Solutions for Southern Blotting
| Reagent/Material | Function | Key Considerations |
|---|---|---|
| Restriction Endonucleases | Cut DNA at specific sequences to generate defined fragments | Select enzymes based on target gene structure; use excess (5-10×) for complete digestion [5] |
| Agarose | Matrix for size-based separation of DNA fragments | Concentration (0.8-2.0%) determines resolution range for different fragment sizes [5] |
| Nylon/Nitrocellulose Membrane | Solid support for immobilized DNA | Nylon membranes offer superior durability and DNA binding capacity [1] |
| Transfer Buffer (20× SSC/SSPE) | Medium for capillary transfer of DNA from gel to membrane | Maintains ionic strength necessary for efficient DNA transfer [6] [4] |
| Blocking Agents | Reduce nonspecific probe binding | Denhardt's solution, salmon sperm DNA, or commercial blocking reagents [4] |
| Labeled DNA Probes | Hybridize to and detect specific target sequences | May be radioactive (³²P) or non-radioactive (digoxigenin, biotin) [1] |
| Hybridization Buffers | Create optimal environment for probe-target binding | PerfectHyb Plus offers optimized hybridization in 1-2 hours [4] |
Current Applications and Comparative Analysis
Contemporary Applications in Research and Diagnostics
Despite being developed nearly five decades ago, Southern blotting maintains relevance in specific research and diagnostic contexts:
Detection of Large Tandem Repeat Expansions: Southern blotting remains valuable for diagnosing disorders caused by expanded repetitive sequences (e.g., myotonic dystrophy type 1 and fragile X syndrome), as it can size fragments too large for PCR amplification [3].
DNA Methylation Analysis: Using methylation-sensitive restriction enzymes, Southern blotting can determine the methylation status of DNA regions, providing clinically relevant information for conditions like fragile X syndrome where methylation correlates with gene silencing [3].
Gene Copy Number Verification: Southern blotting provides a direct method for determining transgene copy number in genetically modified organisms, as demonstrated in recent studies of GM crops [7].
Gene Rearrangement Studies: The technique detects chromosomal rearrangements and translocations in cancer cells, such as immunoglobulin gene rearrangements in lymphomas [2].
Comparative Analysis with Modern Techniques
Recent research directly compares Southern blotting with contemporary molecular analysis methods. A 2024 systematic comparison evaluated Southern blotting (SB), quantitative PCR (qPCR), digital PCR (dPCR), and paired-end whole-genome sequencing (PE-WGS) for determining gene copy numbers in transgenic plants [7].
Table 2: Performance Comparison of Gene Copy Number Analysis Techniques
| Method | Accuracy for Single-Copy Genes | Accuracy for Multi-Copy Genes | DNA Requirement | Technical Expertise | Cost Considerations |
|---|---|---|---|---|---|
| Southern Blotting | Accurate [7] | Less accurate; often underestimates due to complex arrangements [7] | Substantial amount [7] | High technical skills required [7] | Relatively low reagent costs [7] |
| qPCR | Accurate [7] | Struggles with high-copy genes due to resolution limits [7] | Significantly less [7] | Understanding of primer design and qPCR setup [7] | Medium cost with moderate reagent expense [7] |
| dPCR | Accurate [7] | High accuracy due to partitioning capability [7] | Tolerant of DNA degradation [7] | Moderate expertise required [7] | Higher due to equipment costs [7] |
| PE-WGS | Accurate [7] | Precise quantification through adequate coverage [7] | Substantial amount [7] | Significant bioinformatics expertise [7] | Most expensive option [7] |
This comparative research highlights that while all four techniques can accurately quantify single-copy genes, significant discrepancies emerge for multi-copy genes [7]. Southern blotting often underestimates multi-copy genes due to complex arrangements like tandem repeats, while dPCR and PE-WGS provide more accurate quantification in these scenarios [7].
Detailed Experimental Protocol
Genomic DNA Digestion and Electrophoresis
DNA Digestion: Set up restriction digests containing 5-10μg genomic DNA, appropriate restriction enzyme buffer, and 5-10× excess of restriction enzyme(s) in a total volume of 50-100μL. Incubate at 37°C overnight for complete digestion [5]. For complex genomic DNA, adding half the enzyme at the beginning and the remainder after several hours prevents enzyme "exhaustion" [5].
Gel Electrophoresis: Prepare a 0.8% agarose gel in 1× TAE or TBE buffer. Load digested DNA alongside appropriate molecular weight markers. Electrophorese at 1-5 V/cm until adequate separation is achieved [1] [5]. For genomic DNA, longer gels and extended run times improve resolution of similarly sized fragments.
Gel Staining and Documentation: Stain gel with ethidium bromide (0.5μg/mL) or alternative DNA stain and photograph under UV light with a ruler for size reference [6].
DNA Denaturation and Membrane Transfer
Denaturation: sequentially incubate the gel with gentle agitation in:
Capillary Transfer:
- Create a transfer stack with a glass plate bridging a reservoir containing 20× SSC buffer [6].
- Place three sheets of Whatman paper saturated with 20× SSC on the platform to form a "wick" [6].
- Place the gel on the wick, ensuring no air bubbles between layers.
- Place a pre-wetted nylon membrane (cut to gel size) on top of the gel.
- Add three more sheets of filter paper on the membrane, followed by a stack of absorbent paper towels (5-8cm high).
- Place a glass plate and 400-800g weight on top and allow transfer to proceed for 12-24 hours [6] [5].
DNA Fixation: After transfer, rinse membrane briefly in 2× SSC, air dry, and UV-crosslink (for nylon membranes) or bake at 80°C for 2 hours to permanently fix DNA [6] [4].
Hybridization and Detection
Prehybridization: Place membrane in hybridization tube with prewarmed prehybridization solution (e.g., 6× SSC, 0.5% SDS, 5× Denhardt's solution, and 100μg/mL denatured salmon sperm DNA) [5] [4]. Incubate with rotation at appropriate temperature (typically 60-68°C) for 4-6 hours [6].
Probe Preparation and Hybridization: Denature labeled probe (25-50ng for non-radioactive probes) by heating to 95°C for 5 minutes, then immediately cool on ice. Add denatured probe to fresh hybridization buffer, discard prehybridization solution from tube, and add probe/hybridization solution to membrane. Hybridize with rotation for 12-16 hours at appropriate temperature [6].
Post-Hybridization Washes: Perform sequential washes to remove non-specifically bound probe:
Signal Detection: For non-radioactive detection systems:
- Incubate membrane in blocking buffer (e.g., 1% blocking reagent in maleic acid buffer) for 30-60 minutes [6].
- Incubate with antibody conjugate (e.g., anti-digoxigenin-AP) for 30 minutes.
- Wash membrane to remove unbound antibody.
- Incubate with appropriate substrate (NBT/BCIP for colorimetric detection or CDP-Star for chemiluminescence) [6].
- For chemiluminescent detection, expose membrane to X-ray film or capture with digital imaging system.
Critical Technical Considerations
Factors Influencing Hybridization Efficiency
Several parameters significantly impact the specificity and sensitivity of Southern hybridization:
- Temperature: Optimal hybridization temperature is typically 20-25°C below the calculated Tm (melting temperature) of the probe-target duplex. Higher temperatures increase stringency but may reduce sensitivity [1].
- Ionic Strength: Hybridization rate increases with salt concentration due to neutralization of phosphate backbone charges. Low salt concentrations reduce hybridization efficiency [1].
- Probe Concentration: Higher probe concentrations increase hybridization rate but may elevate background signal. Typically 5-25ng/mL for DNA probes is optimal [6].
- Time: Hybridization is typically performed overnight for complex genomes, but shorter periods (2-4 hours) may suffice for high-copy targets with optimized buffers [4].
Troubleshooting Common Issues
- High Background Signal: Can result from insufficient blocking, inadequate washing, or probe concentration too high. Increase blocking agent concentration, perform more stringent washes, or reduce probe concentration [6].
- Weak or No Signal: May indicate insufficient target DNA, inefficient transfer, probe degradation, or excessive washing. Verify DNA quantification, check transfer efficiency using gel staining after transfer, and ensure probe integrity [6].
- Bands Appear Smeared: Often caused by incomplete restriction digestion, DNA degradation, or overloading of gel wells. Ensure complete digestion with adequate enzyme, use high-quality DNA, and avoid overloading [5].
Southern blotting remains an important technique in the molecular biologist's toolkit, particularly for applications requiring direct visualization of DNA fragments without amplification. While largely superseded by PCR-based methods for routine analysis, its ability to characterize large structural variations, determine transgene copy number, and assess methylation status ensures its continued relevance in specialized research and diagnostic contexts. The detailed protocols and comparative analysis provided here offer researchers a comprehensive resource for implementing this classic technique, with understanding of both its capabilities and limitations relative to modern genomic analysis methods. As the 2024 comparative study demonstrates, methodological choice should be guided by specific experimental needs rather than technological novelty alone [7].
This application note details the seminal contributions of Professor Sir Edwin Southern, whose invention of the Southern blot in 1975 fundamentally transformed molecular biology. We explore the historical context, underlying principles, and detailed methodology of this technique, which enabled for the first time the specific detection of DNA sequences within complex genomes. Framed within a broader thesis on DNA sequence detection research, this document provides researchers and drug development professionals with a comprehensive resource, including modernized protocols, key reagent solutions, and data on the technique's enduring applications in genetics and molecular diagnostics.
The 1970s presented a significant challenge in molecular biology: the inability to identify specific DNA sequences within the vast complexity of an entire genome. Existing techniques could separate DNA fragments by size but lacked the specificity to pinpoint individual genes or sequences of interest. It was within this context that Edwin Southern, working at the Medical Research Council (MRC) Mammalian Genome unit in Edinburgh, devised a revolutionary method [8]. First published in 1975, the Southern blot technique combined three key innovations: restriction enzymes for cutting DNA, gel electrophoresis for size separation, and a blotting-transfer method to immobilize DNA for hybridization analysis [9].
The technique's impact was immediate and profound, allowing scientists to discern single-copy eukaryotic genes for the first time [8]. Its influence is further evidenced by the fact that it inadvertently established a naming convention for subsequent biomolecular blotting techniques—Northern (RNA), Western (protein), and Eastern (post-translational modifications)—as a pun on Southern's name [9] [10]. Southern's work, for which he received the Albert Lasker Award for Clinical Medical Research in 2005, laid the essential methodological groundwork for the fields of genomics and molecular diagnostics [11].
The Southern Blot Methodology: Principles and Workflow
The core principle of Southern blotting is the separation of DNA fragments by gel electrophoresis followed by their identification through hybridization with a labeled, sequence-specific probe [12]. The process creates a permanent replica of the electrophoresis gel on a solid membrane, facilitating robust hybridization analysis.
Detailed Experimental Protocol
The following protocol is adapted from modernized laboratory procedures [12] [13] [14].
I. DNA Digestion and Gel Electrophoresis
- DNA Digestion: Incubate 10 µg of high-quality genomic DNA with an appropriate restriction enzyme (e.g., 5-10 units per µg DNA) in the recommended buffer at 37°C for a minimum of 2 hours; for complex genomic DNA, overnight digestion is standard [14]. The goal is complete digestion to ensure clear, reproducible fragments.
- Gel Electrophoresis: Load the digested DNA onto a 0.5-1.2% agarose gel submerged in 1X TBE or TAE buffer. Include a DNA molecular weight ladder for size reference. Electrophorese at 1-10 V/cm until adequate separation is achieved. Visualize the DNA under UV light after staining with ethidium bromide to confirm digestion and separation [12] [13].
II. Gel Pretreatment and Blotting
- Depurination (Optional): For fragments larger than 15 kb, incubate the gel in 0.25 M HCl for 15 minutes with gentle shaking. This acid treatment breaks large DNA into smaller, more transferable pieces [9] [12].
- Denaturation: Soak the gel in a denaturing solution (e.g., 1.5 M NaCl, 0.5 M NaOH) for 20-30 minutes. This process converts double-stranded DNA into single strands, a prerequisite for subsequent probe hybridization [9] [14].
- Neutralization: Immerse the gel in a neutralizing solution (e.g., 1.5 M NaCl, 0.5 M Tris-HCl, pH 7.0-7.5) for 20-30 minutes to prepare the gel for the transfer buffer [12] [14].
- Capillary Transfer:
- Assemble a transfer stack as illustrated in Figure 1. A reservoir is filled with 20X SSC or SSPE transfer buffer.
- A platform is placed in the reservoir and covered with a wick (e.g., Whatman 3MM paper) saturated with transfer buffer.
- The gel is placed on the wick, and any surrounding exposed wick is sealed with plastic wrap to prevent solvent short-circuiting.
- A pre-wetted nylon membrane (slightly larger than the gel) is carefully placed on top of the gel, ensuring no air bubbles are trapped.
- Several sheets of pre-wetted filter paper are placed on the membrane, followed by a stack of dry paper towels (4-6 cm high).
- A glass plate and a weight (~0.2-0.4 kg) are placed on top. Capillary action will draw the buffer through the gel, carrying the DNA and depositing it onto the membrane over 12-24 hours [12] [14].
III. Immobilization, Hybridization, and Detection
- Immobilization: After transfer, recover the membrane. For nylon membranes, UV cross-linking is used to covalently bind the DNA to the membrane. Alternatively, nitrocellulose membranes require baking at 80°C for 2 hours under vacuum [9] [14].
- Pre-hybridization: Place the membrane in a heat-sealable bag or hybridization tube with a pre-hybridization buffer (e.g., PerfectHyb Plus) containing blocking agents (like Denhardt's solution or salmon sperm DNA) at 42-65°C for 1-4 hours. This step blocks non-specific binding sites on the membrane to reduce background noise [12] [14].
- Hybridization: Replace the pre-hybridization buffer with fresh hybridization buffer containing the denatured, labeled probe. Incubate with continuous agitation at the appropriate temperature (e.g., 65°C for DNA probes) for 2 hours to overnight [13] [14].
- Washing and Detection:
- Washing: Perform a series of stringency washes to remove unbound and partially bound probe. Start with low-stringency washes (e.g., 2X SSC, 0.1% SDS) and progress to high-stringency washes (e.g., 0.1X SSC, 0.1% SDS at 65°C) [13].
- Detection: Visualize the hybridized probe based on its label. For radiolabeled probes, expose the membrane to X-ray film or a phosphorimager screen. For chemiluminescent labels, incubate with the appropriate substrate and expose to film [12] [13].
Workflow Visualization
The following diagram illustrates the key procedural stages of the Southern blot protocol.
The Scientist's Toolkit: Essential Reagents and Materials
Successful Southern blotting relies on a suite of specific reagents and equipment. The table below catalogues the essential components and their functions within the protocol.
Table 1: Key Research Reagent Solutions for Southern Blotting
| Item | Function & Role in the Protocol | Examples & Notes |
|---|---|---|
| Restriction Enzymes | Sequence-specific endonucleases that fragment genomic DNA at defined sites, generating a reproducible fragment pattern. | EcoRI, HindIII; supplied with specific reaction buffers [13]. |
| Agarose Gel | Porous matrix that separates DNA fragments based on molecular size under an electric field. | 0.5-1.2% concentration; higher percentages resolve smaller fragments [12]. |
| Nylon Membrane | Positively charged solid support that binds negatively charged DNA fragments after transfer, creating a permanent blot. | BrightStar-Plus membranes; preferred over nitrocellulose for durability and higher DNA binding capacity [9] [13]. |
| Transfer Buffer | Ionic solution (e.g., SSC) used in capillary action to carry DNA from the gel onto the membrane. | 20X Saline Sodium Citrate (SSC) is standard [14]. |
| Labeled Probe | A defined, single-stranded DNA/RNA fragment complementary to the target sequence; its label enables detection. | Can be radiolabeled (²³P) or non-radioactive (biotin, digoxigenin) [9] [13]. |
| Hybridization Buffer | A solution optimized to promote specific binding between the probe and its target on the membrane while minimizing non-specific background. | ULTRAhyb or PerfectHyb Plus; contains salts, buffers, and blocking agents [13] [14]. |
Applications and Impact in Modern Research
Southern blotting remains a powerful tool with well-defined applications in both research and clinical diagnostics, despite the advent of PCR and next-generation sequencing.
Table 2: Enduring Applications of Southern Blotting
| Application Category | Specific Use Case | Technical Rationale |
|---|---|---|
| Genome Mapping & Characterization | Determining gene copy number and identifying gene families [9]. | The intensity of the hybridization signal is proportional to the number of target sequences, allowing for gene quantification. |
| Mutation & Polymorphism Analysis | Detecting insertions, deletions, rearrangements, and point mutations that alter restriction sites (RFLP analysis) [9] [15]. | Altered restriction sites change the size of the DNA fragments detected by the probe, revealing sequence variations. |
| DNA Methylation Studies | Identifying methylated cytosine sites in specific genes [9]. | Uses methylation-sensitive restriction enzymes (e.g., HpaII) whose cutting activity is blocked by methylated bases, yielding different fragment patterns. |
| Diagnostic & Forensic Science | Diagnosis of hereditary diseases (e.g., haemoglobinopathies), facioscapulohumeral muscular dystrophy (FSHD), and genetic fingerprinting [9] [15]. | Provides a direct, gel-based assessment of gene structure, capable of detecting large rearrangements and confirming integrations. |
Technical Considerations and Evolution
Limitations and Troubleshooting
The technique's main limitations include its requirement for a relatively large amount of high-quality DNA, its multi-step and time-consuming nature (often 2-3 days), and the use of hazardous materials (radioactivity, ethidium bromide) [9]. Modern solutions involve using sensitive non-radioactive detection kits (e.g., BrightStar BioDetect) and optimized hybridization buffers that can reduce hybridization time to just 2 hours [13].
Southern's Lasting Legacy: From Blots to Microarrays
The conceptual framework of Southern blotting—immobilizing nucleic acids on a solid support for parallel interrogation—directly inspired later technological revolutions. Edwin Southern himself was a key figure in this transition, founding Oxford Gene Technology and securing foundational patents for DNA microarray technology [16] [11]. This innovation allowed for the simultaneous expression monitoring of thousands of genes, a direct conceptual descendant of the blotting principle applied on a miniaturized, massive scale.
Southern blotting stands as a testament to methodological innovation in molecular biology. Conceived by Edwin Southern to solve a specific problem in gene analysis, its core principles of separation, transfer, and specific hybridization have proven to be remarkably durable and influential. While newer techniques may offer higher throughput for specific applications, the Southern blot remains a gold standard for the direct, size-based analysis of specific DNA sequences, particularly for validating gene copy number, large rearrangements, and integration events. Its historical and technical legacy continues to underpin modern genomic analysis, cementing Sir Edwin Southern's status as a pivotal figure in the field.
This document details the core experimental components—restriction enzymes, gel electrophoresis, and capillary transfer—that form the foundation of the Southern blotting technique. Southern blotting, developed by Edward M. Southern in the 1970s, is a seminal molecular biology method for detecting specific DNA sequences within a complex mixture, providing critical information on gene structure, organization, and methylation status [17] [18]. While newer technologies have replaced it for some high-throughput applications, Southern blotting remains indispensable for applications requiring accurate sizing of large DNA fragments, such as tandem repeat expansions in genetic disorders like myotonic dystrophy and fragile X syndrome, and for assessing DNA methylation [3]. The protocols herein are framed within a research context aimed at validating genomic integrity following genome editing, providing detailed methodologies for researchers, scientists, and drug development professionals.
Core Component 1: Restriction Enzymes
Restriction enzymes, also known as restriction endonucleases, are bacterial-derived proteins that recognize and cut DNA at specific palindromic sequences, serving as the foundation for fragmenting genomic DNA prior to separation and analysis [19]. Their precise activity is the first critical step in generating a definable fragment pattern for downstream hybridization.
Key Principles and Applications
Restriction enzymes function as molecular scissors, enabling the analysis of genomic structure. In the context of Southern blotting for genome editing validation, they are used to digest genomic DNA into fragments of predictable sizes, which, when probed, can reveal the structure of a locus and confirm the success of an edit [20].
Key applications include:
- Gene Mapping and Mutation Detection: Identifying genetic variations and mutations by analyzing changes in fragment lengths (Restriction Fragment Length Polymorphisms, RFLPs) [19].
- Diagnostic Testing: Detecting genetic mutations linked to diseases, such as large repeat expansions in myotonic dystrophy type 1 or fragile X syndrome [3] [19].
- Methylation Analysis: Using methylation-sensitive restriction enzymes that cannot cut methylated DNA to assess the epigenetic status of genomic regions [3].
Quantitative Data on Restriction Enzymes
Table 1: Common Restriction Enzymes and Their Characteristics
| Enzyme Name | Recognition Sequence (5'→3') | Standard Incubation Temperature | Common Applications in Southern Blotting |
|---|---|---|---|
| PvuII | CAG↓CTG | 37°C | Zygosity checks for PRKN X3DEL mutation [20]. |
| EcoNI | CCTNN↓N_NNAGG | 37°C | Zygosity checks for FBXO7 FS mutation [20]. |
| NdeI | CA↓TA_TG | 37°C | Zygosity checks for DJ1 X1-5DEL mutation [20]. |
| SphI | G CATG↓C | 37°C | Detection of SYNJ1 R258Q/FS mutation [20]. |
Detailed Protocol: gDNA Digestion
This protocol is adapted from a working method for validating genome editing in human pluripotent stem cells [20].
Initial Comments: Restriction digestion must be optimized for the specific enzyme and genomic locus. The following is a general guideline.
Materials:
- Purified genomic DNA (gDNA)
- Appropriate Restriction Enzyme (e.g., PvuII, NdeI)
- Compatible Restriction Enzyme Buffer (e.g., rCutSmart Buffer)
- Nuclease-free water
Procedure:
- Reaction Setup: In a nuclease-free microcentrifuge tube, assemble the following components on ice:
- gDNA: 10-15 µg
- Restriction Enzyme: 4 units per 1 µg of DNA (do not exceed 5 µl of enzyme volume per reaction)
- 10X Buffer: 5 µl
- Nuclease-free water: to a final volume of 50 µl
- Incubation: Incubate the reaction mixture at 37°C for 6 hours to overnight. Some enzymes may require alternative temperature settings.
- Completion: Following incubation, the digested DNA is ready for separation by gel electrophoresis. It is not necessary to inactivate the enzyme if the entire sample will be loaded onto the gel.
Core Component 2: Gel Electrophoresis
Gel electrophoresis is the technique for separating DNA fragments by size, a prerequisite for their analysis via Southern blotting [21] [22]. The principle involves applying an electric field to force negatively charged DNA molecules through a porous agarose gel matrix; smaller fragments migrate faster and farther than larger ones, resulting in distinct bands [21] [23].
Key Principles
The electrophoretic mobility of a DNA molecule is governed by its net charge, size, and the properties of the gel matrix [21]. For nucleic acids, the phosphate backbone confers a uniform negative charge, so separation occurs primarily based on fragment size [21]. The concentration of agarose determines the effective size range of separation; lower percentages (e.g., 0.8%) are better for resolving larger fragments typical of genomic Southern blots, while higher percentages resolve smaller fragments [22] [20].
Quantitative Data on Gel Electrophoresis
Table 2: Agarose Gel Specifications for Genomic DNA Separation
| Parameter | Specification/Range | Purpose/Rationale |
|---|---|---|
| Agarose Concentration | 0.8% | Optimal for separating large DNA fragments (1-20+ kb) from genomic digests [20]. |
| Gel Buffer | TAE (Tris-Acetate-EDTA) or TBE (Tris-Borate-EDTA) | Maintains stable pH and provides ions for electrical conductivity [21] [22]. |
| DNA Stain | Ethidium Bromide or SYBR Safe | Intercalates into DNA for visualization under UV light [22] [20]. |
| Voltage & Runtime | Low voltage, extended time (e.g., ~20 hours) | Ensures clear separation of large DNA fragments and prevents smearing [20]. |
| Molecular Weight Marker | 1 kb DNA ladder | Serves as a reference for estimating the size of unknown DNA fragments [20]. |
Detailed Protocol: Agarose Gel Electrophoresis and DNA Denaturation
This protocol follows genomic DNA digestion and precedes capillary transfer [20].
Materials:
- Agarose powder
- Electrophoresis buffer (TAE or TBE)
- DNA staining solution
- 1 kb DNA ladder
- Gel casting tray, comb, and electrophoresis tank
- Power supply
- Denaturation buffer: 0.5M NaOH, 1.5M NaCl [20]
Procedure:
- Gel Preparation: Dissolve 0.8 g of agarose in 100 ml of electrophoresis buffer. Heat until completely dissolved, allow to cool slightly, add DNA stain, then pour into a casting tray with a well-forming comb. Allow to solidify completely [20].
- Sample Loading: Mix the digested DNA samples with a loading dye containing glycerol and a tracking dye. Pipette the samples and a 1 kb ladder into the wells.
- Electrophoresis Run: Submerge the gel in the electrophoresis tank filled with buffer. Apply a low voltage (e.g., 30-40V) and run for an appropriate duration (e.g., ~20 hours) to achieve sufficient separation [20].
- DNA Denaturation: Following electrophoresis, soak the gel in denaturation buffer (0.5M NaOH, 1.5M NaCl) to convert the double-stranded DNA into single-stranded DNA, a necessary step for subsequent hybridization with the probe [17].
Core Component 3: Capillary Transfer
Capillary transfer is the classical method for efficiently and passively moving size-separated DNA fragments from the agarose gel onto a solid nylon or nitrocellulose membrane, where they become immobilized for probing [24] [17]. This process preserves the spatial distribution of DNA bands achieved through electrophoresis.
Key Principles
The transfer relies on capillary action, where a buffer drawn upward through the gel by a stack of dry absorbent paper towels passes through the membrane, carrying the denatured DNA fragments with it. The fragments bind to the membrane upon contact, creating a replica of the gel's band pattern [17]. Nylon membranes are often preferred for their higher binding capacity (∼500 µg/cm) and durability compared to nitrocellulose [17].
Detailed Protocol: Capillary Transfer of DNA
This protocol begins after the gel has been denatured and neutralized [17] [20].
Materials:
- Glass or plastic dish
- Support platform (e.g., a glass plate)
- Whatman filter paper (3MM)
- Nylon membrane (e.g., Amersham Hybond XL)
- Absorbent paper towels or blotting paper
- Weight
- 20X SSC buffer: 3M NaCl, 0.3M sodium citrate [20]
Procedure:
- Setup the Transfer Stack: In a dish, create a platform and cover it with a wick made of Whatman paper saturated with 20X SSC buffer. The wick should be long enough to dip into the reservoir of buffer at the bottom of the dish.
- Place the Gel: Place the denatured agarose gel on top of the wick, ensuring no air bubbles are trapped between them.
- Place the Membrane: Carefully place the pre-cut nylon membrane on top of the gel. Mark the orientation and wells with a pencil. Again, exclude all air bubbles.
- Complete the Stack: Place several sheets of Whatman paper pre-wet with 20X SSC on the membrane, followed by a stack of dry paper towels (5-10 cm high). Place a glass plate on top and add a weight (∼500 g) to ensure even contact.
- Transfer: Allow the capillary transfer to proceed for 6-18 hours (overnight), ensuring the wick remains wet.
- Cross-link DNA: After transfer, carefully disassemble the stack. Cross-link the DNA to the membrane using UV light or, for nitrocellulose, bake at 80°C for 2 hours [17] [20]. The membrane is now ready for pre-hybridization and probing.
The Scientist's Toolkit: Essential Research Reagent Solutions
The following table catalogues the key reagents and materials required to execute the Southern blotting protocols described in this document.
Table 3: Essential Reagents and Materials for Southern Blotting
| Item | Function/Application | Example/Catalog Number |
|---|---|---|
| Restriction Enzymes | Site-specific digestion of genomic DNA. | PvuII, NdeI, SphI [20]. |
| Agarose | Matrix for separating DNA fragments by size via gel electrophoresis. | Standard Low EEO Agarose [20]. |
| Nylon Membrane | Solid support for immobilizing denatured DNA after transfer for probing. | Amersham Hybond XL [20]. |
| DNA Molecular Weight Marker | Reference standard for estimating the size of unknown DNA fragments on the gel. | 1 kb DNA Ladder (NEB N3232) [20]. |
| 20X SSC Buffer | High-salt buffer used during capillary transfer of DNA. | 3M NaCl, 0.3M Sodium Citrate [20]. |
| Church Buffer | Hybridization buffer for incubating the membrane with the labeled probe. | Contains 0.5M NaPO4, 7% SDS, 1% BSA [20]. |
| Radiolabeled Nucleotide ([α-³²P]-dCTP) | Radioactive label incorporated into DNA probes for high-sensitivity detection. | dCTP, [α-³²P] [20]. |
| Imaging System | Detection and documentation of signal from labeled probes on the membrane. | Azure Sapphire FL Biomolecular Imager [18]. |
The three core components integrate sequentially to enable the detection of specific DNA sequences. The process begins with restriction enzyme digestion of DNA, followed by size separation via gel electrophoresis, and culminates in the immobilization of fragments through capillary transfer, which prepares the membrane for hybridization with a labeled probe.
Mastering these foundational components is critical for generating robust and interpretable Southern blot data. This technique remains a powerful tool for detailed genomic analysis, particularly where PCR-based methods fall short, such as in sizing large structural variations and determining methylation status, thereby ensuring accurate validation in advanced genetic research and diagnostics.
The Critical Role of Probe Hybridization in Detecting Specific DNA Sequences
Southern blotting, a technique pioneered by Edwin Southern in 1975, remains a foundational method in molecular biology for detecting specific DNA sequences within complex samples [2] [18]. At the heart of this technique lies probe hybridization, a process that enables researchers to identify specific genes, analyze genomic structure, and validate genetic modifications with high specificity. The method combines gel electrophoresis with nucleic acid hybridization to create a powerful analytical tool that provides information about DNA identity, size, and abundance [25]. Despite the advent of PCR-based methods, Southern blotting maintains its relevance in applications requiring definitive validation of gene structure, including mutation detection, gene mapping, and confirmation of homologous recombination events in genetically engineered organisms [2] [26] [27].
The critical importance of probe hybridization extends across multiple research domains. In functional genetics, it serves as the definitive method for validating the structure of targeted alleles produced by homologous recombination [26]. In disease research, it facilitates the detection of gene rearrangements, deletions, and amplifications relevant to cancer studies and heritable disorders [2] [18]. For forensic applications and diagnostic testing, Southern blotting provides reliable DNA fingerprinting and mutation detection capabilities [27]. The technique's ability to deliver quantitative results reflecting the amounts of digested and undigested DNA molecules further enhances its utility in rigorous scientific applications [18].
Fundamental Principles of Southern Blot Hybridization
Molecular Basis of Specific Hybridization
The specificity of Southern blotting hinges on the complementary base pairing between the probe and target DNA sequences. Under appropriate conditions, single-stranded probe molecules form stable hydrogen bonds with their complementary sequences on the membrane-bound DNA [2]. This molecular recognition process is remarkably precise, allowing researchers to distinguish between sequences with high similarity. The stringency of hybridization—controlled by factors such as temperature, ionic strength, and solvent composition—determines the degree of sequence matching required for stable duplex formation [25]. High-stringency conditions demand perfect or near-perfect complementarity, while lower stringency permits hybridization between similar but not identical sequences, which is useful for detecting homologous genes across species [2].
The hybridization process follows predictable kinetics and thermodynamics influenced by multiple factors. Probe length significantly impacts hybridization efficiency, with longer probes (typically 500-1000 bp) providing stronger signals but potentially reduced specificity compared to shorter probes [27]. The GC content of both probe and target affects duplex stability due to the triple hydrogen bonds between guanine and cytosine versus the double bonds between adenine and thymine. Additionally, probe concentration and hybridization duration must be optimized to ensure sufficient signal intensity without excessive background [28] [20].
Critical Experimental Parameters
Several technical parameters must be carefully controlled to ensure successful hybridization outcomes. Temperature is perhaps the most critical factor, with most DNA-DNA hybridizations performed at 65°C or higher to promote specificity [28] [20]. The hybridization solution composition plays a vital role in facilitating probe-target interactions while minimizing non-specific binding. Commercial hybridization buffers like ULTRAhyb can increase sensitivity up to 100-fold compared to standard solutions by pushing hybridization to completion without increasing background [25]. Time represents another crucial parameter, with hybridization typically requiring several hours to overnight incubation to reach completion, though specialized buffers can reduce this to approximately two hours for many targets [25].
Post-hybridization washing conditions are equally important for achieving specific detection. Initial low-stringency washes with solutions such as 2X SSC remove hybridization solution and unhybridized probe, while subsequent high-stringency washes with 0.1X SSC or SSPE remove partially hybridized probe molecules [25]. The result is that only fully hybridized labeled probe molecules with complementary sequence to the region of interest remain bound to the membrane [25]. This stepwise reduction in ionic strength and potential increase in temperature effectively discriminates between perfectly matched and mismatched duplexes, ensuring that detected signals derive specifically from the target sequence.
Probe Design and Preparation Methodologies
Strategic Probe Design Considerations
Effective probe design is paramount for successful Southern blot hybridization. The fundamental requirement is that the probe sequence must be unique within the genome for the gene or locus of interest to prevent cross-hybridization with other endogenous DNA sequences [27]. Bioinformatic tools have been developed to automate this process, generating candidate probes and evaluating their potential for cross-hybridization through genome-wide similarity searches [27]. These tools employ a brute-force strategy of generating many candidate probes of acceptable length in a user-specified design window, searching all against the target genome, then scoring and ranking the candidates by uniqueness and repetitive DNA element content [27].
Several specific criteria must be considered during probe design. Probe length significantly impacts performance, with fragments of at least 300 bp required for efficient labeling in random priming reactions, though 500-1000 bp probes are typically employed in practice [27]. Repetitive elements within candidate probe sequences must be minimized or eliminated, as these can result in intense background smears upon hybridization that obscure single-copy gene hybridization signals [27]. The genomic context of the target sequence influences probe selection, with external probes (corresponding to genomic sequences adjacent to homology arms but not contained in targeting constructs) used to validate homologous recombination events, while internal probes (within the targeting construct) can serve as universal reagents for assessing allelic integrity [26].
Probe Labeling Techniques
Various labeling methods enable detection of hybridized probes, each with distinct advantages and applications. Radioactive labeling using [α-32P] dCTP provides high sensitivity and remains widely used, particularly for detecting low-abundance targets [28] [20]. However, safety concerns and regulatory restrictions associated with radioactive materials have driven the development of robust non-radioactive alternatives [26]. These include digoxigenin (DIG)-labeled probes detected by enzyme-linked immunoassays, biotinylated probes detected with streptavidin-enzyme conjugates, and directly fluorophore-labeled probes for immediate detection without secondary reagents [26] [18].
The selection of appropriate labeling methodology depends on multiple factors. Sensitivity requirements dictate choice, with radioactive and chemiluminescent detection generally offering the highest sensitivity. Experimental timeframe influences selection, as non-radioactive methods typically provide more rapid results without extended exposure times. Equipment availability may determine feasibility, as fluorescent detection requires appropriate imaging systems. Probe stability considerations favor non-radioactive methods, which avoid isotope decay issues. Recent advances in fluorescent detection methods, particularly near-infrared (NIR) fluorophores, offer sensitivity approaching radioactive methods with the convenience of stable reagents and direct imaging capabilities [18].
Table 1: Comparison of Southern Blot Probe Labeling and Detection Methods
| Label Type | Detection Method | Sensitivity | Advantages | Limitations |
|---|---|---|---|---|
| Radioactive ([α-32P] dCTP) | X-ray film or phosphorimaging [28] [20] | High | Maximum sensitivity; well-established protocols | Safety concerns; short probe half-life; regulatory requirements |
| Digoxigenin (DIG) | Enzyme-conjugated anti-DIG antibody + chemiluminescent substrate [26] [18] | High | Stable probes; safe handling; cost-effective | Requires optimization; multiple steps |
| Biotin | Enzyme-conjugated streptavidin + chemiluminescent substrate [18] | High | Stable probes; versatile detection | Endogenous biotin may cause background |
| Fluorescent dyes | Direct imaging with laser scanner [18] | Moderate | Rapid detection; no additional reagents | Requires specialized imaging equipment |
Experimental Protocols for Probe Hybridization
Standardized Southern Blot Protocol
The following protocol outlines a robust approach for Southern blot hybridization, adaptable for both radioactive and non-radioactive detection methods [20] [26]:
A. DNA Digestion and Electrophoresis
- Digest genomic DNA (10-15 μg) with appropriate restriction enzyme (4 U per 1 μg DNA) in recommended buffer at 37°C for 6 hours to overnight [20].
- Separate digested DNA fragments by 0.8% agarose gel electrophoresis at low voltage to ensure proper resolution [20].
- Include appropriate DNA size markers (e.g., 1 kb ladder) for subsequent fragment size determination [20].
B. Membrane Transfer
- Depurinate DNA in gel by incubation in 0.25M HCl for 15 minutes [20].
- Denature DNA by incubating gel in denaturation buffer (0.5M NaOH, 1.5M NaCl) for 30 minutes [20].
- Transfer DNA to positively charged nylon membrane using capillary or electrophoretic transfer methods [25].
- Immobilize DNA on membrane by UV cross-linking or baking [28].
C. Probe Preparation
- Generate probe by PCR amplification using AccuPrime Taq DNA Polymerase or similar high-fidelity enzyme [20].
- Purify PCR product using gel extraction kit to ensure probe specificity [20].
- Label probe using random primer labeling method with [α-32P] dCTP for radioactive detection or DIG/biotin labeling kits for non-radioactive detection [28] [26].
- Purify labeled probe using illustra ProbeQuant G-50 Micro Columns or similar to remove unincorporated nucleotides [20].
D. Hybridization and Detection
- Prehybridize membrane with Church buffer (1 mM EDTA, 0.5M NaPO4 pH 7.2, 7% SDS, 1% BSA) or commercial hybridization buffer (e.g., ULTRAhyb) at 65°C for 30 minutes [20] [25].
- Add labeled probe to hybridization solution at appropriate concentration (e.g., 25 ng/mL for DIG-labeled probes) and incubate at 65°C for 2 hours to overnight [28] [20] [25].
- Perform post-hybridization washes: initial wash with 2X SSC, 0.1% SDS followed by stringent wash with 0.5X SSC, 0.1% SDS at 65°C for 15 minutes each [28] [25].
- Detect hybridized probe using appropriate method: X-ray film or phosphorimager for radioactive probes, chemiluminescent substrate with X-ray film for enzyme-based detection, or direct scanning for fluorescent probes [20] [25] [18].
Critical Control Experiments
Proper experimental design includes control reactions to validate hybridization specificity and assay performance. Positive controls consisting of known restriction fragments containing the target sequence confirm probe functionality and hybridization efficiency. Negative controls with DNA samples lacking the target sequence (e.g., wild-type genomic DNA when detecting a specific mutation) verify probe specificity and identify potential cross-hybridization. Restriction digestion controls assess completion of DNA digestion, which is critical for accurate fragment size determination and interpretation [2].
For quantitative applications, standard curves generated from serial dilutions of target DNA enable quantification of target abundance in test samples. When analyzing genetically modified cells or tissues, germline controls (unmodified counterparts) provide reference bands for distinguishing between wild-type and modified alleles [2] [26]. In gene targeting experiments, both external probes (homologous to sequences outside the targeting construct) and internal probes (homologous to sequences within the targeting construct) provide complementary information about targeted integration and allele structure [26].
Diagram 1: Southern Blot Workflow with Highlighted Hybridization Steps. The critical hybridization phase encompasses membrane blocking, probe hybridization, stringent washing, and signal detection stages.
Research Reagent Solutions for Hybridization Experiments
Successful Southern blot hybridization requires specific reagents optimized for each procedural step. The following table details essential materials and their functions in hybridization experiments:
Table 2: Essential Research Reagents for Southern Blot Hybridization
| Reagent Category | Specific Examples | Function in Hybridization | Application Notes |
|---|---|---|---|
| Restriction Enzymes | EcoRI, PvuII, NdeI, AseI [20] | Generate specific DNA fragments for analysis | Selection depends on restriction map of target locus; 4 U/μg DNA recommended [20] |
| Membrane Systems | Hybond-N+, Amersham Hybond XL, BrightStar-Plus [28] [20] [25] | Immobilize target DNA for hybridization | Positively charged nylon membranes preferred for DNA binding capacity [25] |
| Hybridization Buffers | Church buffer, DIG Easy Hyb, ULTRAhyb [28] [20] [25] | Create environment promoting specific probe binding | ULTRAhyb can increase sensitivity 100-fold vs. standard buffers [25] |
| Labeling Systems | [α-32P] dCTP, Prime-It II Random Primer Labeling, PCR DIG Probe Synthesis [28] [20] | Incorporate detectable tags into hybridization probes | Random primer labeling efficient for probes >300 bp [27] |
| Detection Reagents | CDP-Star, BrightStar BioDetect, radiographic film [20] [25] | Visualize hybridized probes | Chemiluminescent substrates enable non-radioactive detection with high sensitivity [25] |
Applications in Genetic Research and Validation
Gene Targeting and Validation
Southern blotting with specific probe hybridization serves as the definitive method for validating targeted genetic modifications in embryonic stem cells and genetically engineered organisms [26] [27]. This application is particularly crucial for functional genetics studies, where precise allele structure must be confirmed before phenotypic analysis. When characterizing gene-targeted events, Southern blotting reveals both the presence of the targeted allele and the number of integrations of the targeting construct into the genome [26]. The technique can distinguish between homologous recombination events (which produce a single novel band of expected size in addition to the wild-type band) and random integration events (which typically generate multiple novel bands of varying sizes) [26].
In the context of large-scale genetic engineering projects such as the International Mouse Phenotyping Consortium (IMPC), Southern blotting with universal probes targeting common elements in targeting constructs (e.g., lacZ or neo selectable marker sequences) has enabled high-throughput validation of targeted alleles across multiple genomic loci [26]. This approach significantly streamlines the validation process by eliminating the need for locus-specific probe design and optimization for each target gene. The reliability of Southern blotting for detecting homologous recombination events makes it indispensable for gene knockout validation, conditional allele verification, and confirmation of transgene integration patterns [27].
Mutation Detection and Genomic Rearrangements
Probe hybridization in Southern blotting enables sensitive detection of structural variations in genomic DNA, including large deletions, duplications, rearrangements, and translocations [2] [18]. In diagnostic applications, this capability permits identification of disease-associated mutations that alter restriction fragment patterns. For example, in Congenital Adrenal Hyperplasia (CAH), Southern blotting detects CYP21A2 gene deletions present in 25-30% of patients, which is crucial for accurate molecular diagnosis [2]. Similarly, in cancer research, Southern blotting identifies oncogene rearrangements and translocations, such as BCR/ABL translocations in hematological malignancies, providing important diagnostic and prognostic information [2].
The technique's ability to provide quantitative information about gene copy number makes it valuable for identifying gene amplifications associated with certain cancers and drug resistance mechanisms [18]. Unlike PCR-based methods, Southern blotting can detect rearrangements regardless of the specific breakpoint location within a large genomic region, making it particularly useful for analyzing genes with distributed breakpoints [2]. However, a significant limitation is that Southern blotting generally requires a relatively high proportion (5-10%) of mutant cells in the analyzed sample, making it less sensitive than some PCR-based methods for detecting minimal residual disease [2].
Troubleshooting and Optimization Strategies
Addressing Common Hybridization Challenges
Several technical issues can compromise Southern blot hybridization results, each with specific diagnostic features and corrective approaches:
High Background Signal typically results from incomplete blocking, insufficient washing, or probe overlabeling. Remedial actions include increasing the stringency of post-hybridization washes (e.g., using 0.1X SSC with 0.1% SDS at 65°C), optimizing blocking conditions with fresh BSA (1% in Church buffer), or repurifying the labeled probe to remove unincorporated nucleotides [20] [25]. Weak or Absent Signal may indicate poor probe labeling, insufficient target DNA, or excessive stringency. Solutions include verifying probe labeling efficiency, increasing the amount of target DNA (up to 15-20 μg per lane), reducing hybridization stringency (e.g., lowering temperature to 60°C), or extending hybridization time to overnight [20] [25].
Non-specific Bands suggest cross-hybridization to related sequences or partial probe complementarity. This can be addressed by increasing hybridization stringency, using more specific probe sequences verified by bioinformatic analysis, or employing cross-species hybridization under reduced stringency conditions when studying homologous genes [2] [27]. Uneven Background often indicates improper membrane handling or uneven hybridization. Prevention methods include ensuring consistent membrane wetting before hybridization, using sufficient hybridization volume with continuous agitation, and avoiding membrane drying during processing [25].
Quantitative Optimization Approaches
Systematic optimization of key parameters significantly enhances hybridization performance:
Probe Concentration Optimization involves testing a range from 10-50 ng/mL for non-radioactive probes or 1-10 × 10^6 cpm/mL for radioactive probes to identify the concentration providing optimal signal-to-noise ratio [20] [25]. Hybridization Time Optimization balances signal intensity with practicality, with minimum times of 2 hours using specialized buffers like ULTRAhyb and maximum benefit reached by 16-18 hours for standard buffers [28] [25].
Temperature Optimization considers both hybridization and washing steps. Standard DNA-DNA hybridizations perform well at 65°C, but adjustment may be necessary for targets with atypical GC content. Similarly, wash temperature significantly impacts stringency, with increases of 5-10°C dramatically enhancing specificity for high-GC targets [28] [25]. Membrane Selection influences sensitivity and background, with positively charged nylon membranes generally preferred over nitrocellulose for their superior DNA binding capacity and mechanical strength [25].
Probe hybridization represents the definitive specificity-determining step in Southern blot analysis, enabling researchers to detect specific DNA sequences within complex genomic backgrounds. The continued relevance of this decades-old technique stems from its unique ability to provide comprehensive information about DNA identity, size, and abundance in a single assay [25] [18]. While PCR-based methods have replaced Southern blotting for some applications, the technique maintains its position as the gold standard for validating gene targeting events, detecting genomic rearrangements, and analyzing complex genetic loci [2] [26] [27].
Future directions in Southern blot hybridization include increased automation of both probe design and detection phases, enhanced sensitivity through improved labeling and detection chemistries, and integration with complementary molecular analysis techniques [18] [27]. The development of bioinformatic tools for automated probe design has already significantly reduced the time and expertise required to develop effective hybridization probes [27]. Similarly, advances in non-radioactive detection methods have addressed safety concerns while maintaining the sensitivity required for demanding applications [26] [18]. These ongoing refinements ensure that Southern blotting with specific probe hybridization will remain an essential technique in the molecular biology toolkit, providing definitive answers to critical questions about genome structure and function.
Mastering the Southern Blot Workflow: From DNA to Detection
High-Quality DNA Preparation and Restriction Enzyme Digestion
Within the framework of research aimed at detecting specific DNA sequences via Southern blotting, the initial steps of High-Quality DNA Preparation and Restriction Enzyme Digestion are critically important. The reliability and interpretability of the entire assay depend on the integrity of the genomic DNA and its complete digestion into predictable fragments [25]. This protocol details the methodologies for obtaining high-molecular-weight DNA and performing its restriction digest, forming the foundational steps for subsequent electrophoresis, transfer, and hybridization analyses [29] [15].
The process of preparing DNA for Southern blot analysis involves a sequence of key steps, from cell lysis to the final digested DNA product ready for electrophoresis.
Protocol: DNA Extraction and Purification
Cell Lysis
Initiate the protocol by lysing cells to liberate genomic DNA. For mammalian cells or tissues, use a lysis buffer containing 100 mM Tris-Cl (pH 8.5), 5 mM EDTA, 200 mM NaCl, and 0.2% SDS, supplemented with 100 µg/mL Proteinase K [20]. Incubate the mixture for several hours to overnight at 37°C to ensure complete digestion of cellular proteins and nucleases [20].
DNA Precipitation and Purification
Following lysis, precipitate the DNA by adding an equal volume of isopropanol and mixing vigorously until a white, filamentous DNA pellet is visible [20]. Centrifuge the sample at maximum speed (≥13,000 x g) for 5 minutes at room temperature to pellet the DNA [20]. Decant the supernatant and wash the pellet with 1 mL of 70% ethanol to remove residual salts, followed by another centrifugation step [20]. Carefully aspirate the ethanol and allow the pellet to air-dry for 10-20 minutes until it becomes translucent, ensuring it is not overdried as this hinders resuspension [20].
DNA Resuspension and Storage
Resuspend the purified DNA pellet in TE buffer (10 mM Tris-Cl, 1 mM EDTA, pH 8.0) and allow it to solubilize completely over 12-24 hours at 56°C [20]. Store the high-quality DNA at 4°C for immediate use or at -20°C for long-term storage.
Protocol: Restriction Enzyme Digestion
Restriction Enzyme Selection
The choice of restriction enzyme is determined by the specific experimental goal. For standard fragment analysis, frequently used enzymes include EcoRI, HindIII, and BamHI [25]. For specialized applications like methylation studies, methylation-sensitive enzymes (e.g., HpaII) are required [3]. The probe and target sequence determine the optimal enzyme choice [20].
Digestion Reaction Setup
A standard digestion reaction is assembled on ice as detailed in Table 1. Using a 4-unit excess of enzyme per µg of DNA is recommended for complete genomic DNA digestion, which is crucial for detecting single-copy genes [29] [15].
Table 1: Restriction Digestion Reaction Setup
| Component | Volume | Final Amount/Concentration |
|---|---|---|
| Genomic DNA | Variable | 10-15 µg |
| 10X Restriction Enzyme Buffer | 5 µL | 1X |
| Restriction Enzyme | 4 U/µg DNA (max 5 µL) | 16-60 U |
| Nuclease-free Water | To 50 µL | - |
Incubation and Completion
Incubate the reaction mixture at the enzyme's optimal temperature, typically 37°C, for 6 hours to overnight [20]. Extended incubation with an enzyme excess ensures complete digestion, especially for complex genomic DNA [29]. After digestion, the DNA can be used directly for electrophoresis or concentrated by ethanol precipitation if necessary [29].
Quantitative Data and Quality Control
Successful Southern blotting requires careful quantification and quality control at each step. Key parameters are summarized in Table 2.
Table 2: Key Quantitative Parameters for DNA Preparation and Digestion
| Parameter | Optimal Value/Range | Quality Control Method |
|---|---|---|
| DNA Purity (A260/A280 ratio) | 1.8 - 2.0 [20] | Spectrophotometry |
| DNA Concentration | 10-15 µg per digestion [20] | Spectrophotometry or Fluorometry |
| DNA Integrity | High molecular weight (>20 kb) | Agarose Gel Electrophoresis |
| Enzyme-to-DNA Ratio | 4 U/µg DNA [20] | Calculation |
| Digestion Incubation Time | 6 hours to overnight [20] | - |
| Digestion Temperature | 37°C (for most enzymes) [20] | - |
| Complete Digestion Indicator | Smear of fragments on gel [15] | Agarose Gel Electrophoresis |
Research Reagent Solutions
Essential reagents and their specific functions in the DNA preparation and digestion workflow are cataloged in Table 3.
Table 3: Essential Research Reagents and Their Functions
| Reagent | Function | Example |
|---|---|---|
| Lysis Buffer | Disrupts cell membranes and inactivates nucleases. | Tris-Cl, EDTA, NaCl, SDS [20] |
| Proteinase K | Digests proteins and degrades nucleases. | Added fresh to lysis buffer [20] |
| Restriction Enzymes | Sequence-specific endonucleases that cut DNA at defined sites. | EcoRI, HindIII, PvuII [20] [25] |
| Restriction Buffer | Provides optimal salt and pH conditions for enzyme activity. | rCutSmart Buffer [20] |
| TE Buffer | Stable, neutral pH buffer for DNA resuspension and storage. | 10 mM Tris-Cl, 1 mM EDTA [20] |
| UltraPure Agarose | Matrix for separating DNA fragments by size via electrophoresis. | - |
Within the Southern blotting workflow, agarose gel electrophoresis is a critical separation step that occurs after DNA digestion with restriction enzymes and before membrane transfer [3] [25]. This procedure resolves the complex mixture of DNA fragments by size, forming the foundation for subsequent hybridization and detection of specific sequences. The goal of this step is to produce a gel with sharp, well-resolved DNA bands that accurately reflect the fragment sizes present in the sample, enabling reliable analysis in diagnostic and research applications, such as detecting large tandem repeat expansions in genetic disorders [3].
Principle of Separation
Agarose gel electrophoresis separates DNA fragments based on their size by applying an electric field to a gel matrix. DNA molecules, being negatively charged due to their phosphate backbone, migrate toward the positive anode [30]. The agarose gel acts as a molecular sieve; smaller fragments navigate the porous network more easily and travel faster, while larger fragments are impeded and migrate more slowly [30] [31]. The distance a DNA fragment travels is inversely proportional to the logarithm of its molecular weight [30]. For Southern blotting, this separation allows a DNA ladder of known sizes to be used as a reference for estimating the size of unknown restriction fragments in the patient's sample [3].
Materials and Equipment
Research Reagent Solutions
The following reagents are essential for successful agarose gel electrophoresis:
| Item | Function | Key Considerations |
|---|---|---|
| Agarose | Forms the porous gel matrix for separation. | Standard or high-resolution grades (e.g., MetaPhor) for fragments <20 bp apart [32]. |
| Running Buffer (1X TAE or TBE) | Conducts current and maintains stable pH. | TAE is preferred for longer fragments (>1 kb) and downstream enzymatic steps; TBE offers better buffering capacity for long runs and resolution of smaller fragments [33] [31]. |
| DNA Ladder | Provides molecular weight standards for sizing unknown fragments. | Select a ladder with bands in the expected size range; chromatography-purified ladders ensure accuracy [33]. |
| Loading Dye | Adds density for well-loading and contains tracking dyes to monitor migration. | Contains dyes like bromophenol blue and xylene cyanol; avoid dyes that comigrate with bands of interest [33] [30]. |
| Staining Agent (e.g., Ethidium Bromide) | Intercalates with DNA for visualization under UV light. | Ethidium bromide is a known mutagen; handle with care. Safer, non-carcinogenic alternatives include SYBR Safe, SYBR Gold, Crystal Violet, or Methyl Blue [30]. |
| Restriction Enzymes | Cut genomic DNA into specific fragments for analysis. | High-quality enzymes ensure complete digestion. Validation for use with universal buffers is recommended [25]. |
Equipment
- Gel casting apparatus (tray and combs)
- Horizontal gel electrophoresis chamber and power supply
- Microwave or hot plate for melting agarose
- UV transilluminator or gel documentation system
- Pipettes and tips
Protocol
Gel Preparation
- Calculate Gel Concentration: Choose an agarose percentage based on the expected size of your DNA fragments to achieve optimal separation. Refer to Table 1 for guidance.
- Dissolve Agarose: Weigh the appropriate amount of agarose and mix with the desired volume of 1X TAE or TBE buffer in a heat-resistant flask. The buffer must match the one used in the electrophoresis tank [34].
- Heat the Mixture: Heat the mixture in a microwave oven using short bursts, swirling intermittently, until the agarose is completely dissolved and the solution is clear. Avoid vigorous boiling to prevent evaporation that alters gel concentration [34] [30].
- Cool Agarose: Allow the molten agarose to cool to approximately 50-55°C to prevent warping of the casting tray [34] [35]. Swirl the flask occasionally to ensure even cooling.
- Add Stain (Optional): If incorporating stain directly into the gel, add the appropriate volume (e.g., ethidium bromide to a final concentration of 0.2-0.5 μg/mL) and mix thoroughly [34] [30]. Always wear personal protective equipment when handling mutagens.
- Cast the Gel: Place the comb in the gel tray on a level surface. Pour the cooled agarose solution into the tray, avoiding air bubbles. If bubbles form, remove them with a pipette tip. Let the gel solidify completely at room temperature for 20-30 minutes [34] [30].
Sample Preparation and Loading
- Prepare DNA Samples: Mix DNA samples with a loading dye containing glycerol or Ficoll. A typical ratio is 5 μL of loading dye per 25 μL of DNA sample [34]. For Southern blotting, the DNA is already digested with restriction enzymes in the previous step [3] [25].
- Prepare DNA Ladder: Dilute the DNA ladder as recommended by the manufacturer and mix it with the same loading dye.
- Set Up Gel Box: Once solidified, carefully remove the comb and place the gel in the electrophoresis chamber. Submerge the gel completely with 1X running buffer, ensuring the gel is covered by about 3-5 mm of buffer [33] [34].
- Load Samples: Using a pipette, slowly load the prepared DNA ladder and samples into the wells. Maintain positive pressure to prevent buffer from entering the pipette tip and load steadily to ensure the sample sinks to the bottom of the well [34].
Electrophoresis Conditions
- Connect Power Supply: Ensure the electrodes are correctly connected—the DNA, being negatively charged, will migrate toward the positive anode (red). "Always Run to Red" [34].
- Set Voltage and Run: Apply a voltage of 1-5 V per cm of gel length [30]. For a standard mini-gel, 80-150 V is common. Run the gel until the dye front has migrated 75-80% of the way down the gel [34]. Lower voltages run for longer times often improve band resolution.
- Post-Run Visualization: After turning off the power, carefully remove the gel. If the stain was not added during gel preparation, perform post-staining by soaking the gel in a staining solution (e.g., EtBr in TAE buffer) for 15-30 minutes, followed by a destaining step in water if necessary [34] [30]. Visualize the DNA bands using a UV transilluminator or blue light system.
Expected Results and Analysis
A successful electrophoresis run will display sharp, well-defined DNA bands. The DNA ladder will show a series of distinct bands corresponding to known fragment sizes, against which the sizes of the sample fragments can be estimated [3] [30]. In Southern blotting for conditions like myotonic dystrophy, the size of the fragments is critical, as the severity of the phenotype can depend on the size of a repeat expansion [3]. The separated DNA fragments are now ready for the subsequent transfer step in the Southern blotting workflow.
Agarose Concentration Guidelines
Table 1: Guidelines for agarose gel concentration based on DNA fragment size. Adapted from [32].
| Target DNA Size Range | Recommended Agarose Concentration |
|---|---|
| 500 bp - 25 kb | 0.7% - 1.0% |
| 750 bp - 2,000 bp | 1.3% |
| 500 bp - 750 bp | 1.7% - 2.0% |
| 250 bp - 500 bp | 2.5% - 3.0% |
| < 250 bp | 3.0% - 4.0% |
Troubleshooting Common Issues
Table 2: Common issues, their causes, and solutions in agarose gel electrophoresis.
| Problem | Potential Cause | Solution |
|---|---|---|
| Faint or No Bands | Insufficient DNA loaded, sample degradation, incorrect electrode connection, or stain sensitivity [36]. | Load 0.1-0.2 μg of DNA per mm of well width; ensure reagents are nuclease-free; check that the negative electrode (black) is at the well end; use fresh stain or increase staining time [36]. |
| Smeared Bands | Sample overloaded, DNA degradation, gel too thick (>5 mm), or voltage too high [36]. | Reduce the amount of DNA loaded; practice good aseptic technique to avoid nucleases; cast gels 3-4 mm thick; run the gel at a lower voltage [36]. |
| Poor Band Resolution | Incorrect agarose percentage, voltage too high, or poorly formed wells [36] [34]. | Use a higher percentage agarose for smaller fragments; lower the voltage for longer run times; ensure the comb is clean and not pushed to the very bottom of the tray [36]. |
| "Smiling" Effect (bands curve upward) | Uneven heating across the gel, typically from excessively high voltage [33]. | Reduce the voltage during the run and ensure the electrophoresis tank is functioning properly with good contact [33]. |
Workflow Integration
The following diagram illustrates the position of gel electrophoresis within the complete Southern blot analysis workflow.
Following DNA digestion and gel electrophoresis, the efficient transfer of separated DNA fragments from the gel to a solid membrane is a critical step in Southern blotting. This process creates a permanent replica of the fragment pattern for subsequent hybridization and analysis. The two principal methods for this transfer are capillary and vacuum blotting. This application note details the protocols for both, providing researchers with the information needed to achieve consistent, high-quality results.
Principles of Membrane Transfer
After electrophoresis, DNA fragments are immobilized within the gel matrix, making them inaccessible for hybridization with labeled probes. Transfer moves these fragments onto a thin, porous membrane, which provides a durable and accessible support. The DNA is typically denatured into single strands before or during transfer to facilitate later binding to the probe [17].
The choice of membrane is crucial. While nitrocellulose was used traditionally, positively charged nylon membranes are now widely preferred due to their higher tensile strength and greater DNA binding capacity, approximately 500 µg/cm compared to nitrocellulose's 100 µg/cm [17]. These membranes are ideal for use with both radioactive and non-isotopic probes to achieve a strong hybridization signal with minimal background [25].
Comparative Analysis of Transfer Methods
The two most common transfer techniques are capillary action and vacuum blotting. The table below summarizes their key characteristics for easy comparison.
Table 1: Quantitative Comparison of Capillary and Vacuum Blotting Methods
| Characteristic | Capillary (Upward) Blotting | Vacuum Blotting |
|---|---|---|
| Principle | Passive transfer via capillary action, drawing buffer upward through the gel and membrane into a stack of dry absorbent paper [17]. | Active transfer where a vacuum sucks buffer downward through the gel and membrane into an absorbent material [37] [38]. |
| Typical Duration | Several hours to overnight [17] [25]. | About 1 hour [17]. |
| Simplicity & Cost | Simple setup, requires no special equipment other than a stack of paper towels and a weight. | Requires a vacuum blotting apparatus and a regulated vacuum source [17]. |
| Efficiency & Consistency | Reliable but slow; efficiency can be lower for larger fragments (>15 kb) without a depurination step [17]. | Faster and more consistent transfer; efficient for a range of fragment sizes [39]. |
| Risk of Gel Collapse | Low risk. | Moderate risk; a strong vacuum can collapse the gel, blocking transfer [37]. |
Detailed Experimental Protocols
Protocol A: Capillary Transfer
This traditional method is valued for its simplicity and minimal equipment requirements.
Research Reagent Solutions & Essential Materials
- Membrane: Positively charged nylon membrane (e.g., Invitrogen BrightStar-Plus) [25].
- Transfer Buffer: High-salt buffer, typically 20X SSC (3 M Sodium Chloride, 0.3 M Sodium Citrate) [17].
- Absorbent Stack: A stack of paper towels or other dry absorbent papers.
- Whatman 3MM Paper: For creating the wick and the gel/membrane sandwich.
- Weight: A lightweight object (approx. 200 g) to place on top of the stack.
Step-by-Step Methodology:
Post-Electrophoresis Treatment:
- Depurination (Optional): For DNA fragments larger than 15 kb, soak the gel in 0.25 M HCl for 15-30 minutes with gentle agitation. This acid depurination step cleaves the DNA into smaller, more easily transferable fragments. Rinse the gel thoroughly with deionized water after this step [17].
- Denaturation: Submerge the gel in a denaturing solution (e.g., 0.5 M NaOH, 1.5 M NaCl) for 30 minutes with gentle agitation. This converts double-stranded DNA into single strands [17].
- Neutralization: Soak the gel in a neutralizing solution (e.g., 0.5 M Tris-HCl, 3 M NaCl, pH 7.4) for 30 minutes with gentle agitation [17].
Assembly of the Transfer Stack:
- Fill a glass or plastic dish with a sufficient volume of 20X SSC transfer buffer.
- Place a platform over the buffer and lay a wick of Whatman 3MM paper over it, with both ends submerged in the buffer to draw it upward.
- Place the gel on the wick, ensuring no air bubbles are trapped between them.
- Carefully place the pre-cut nylon membrane (cut to the exact size of the gel and pre-wet in water or transfer buffer) directly onto the gel.
- Place 2-3 sheets of Whatman 3MM paper, cut to size and pre-wet with transfer buffer, on top of the membrane.
- Place a stack of dry paper towels (5-10 cm high) on top of the filter papers.
- Place a glass plate and a weight (~200 g) on top of the stack to ensure good contact between all layers.
Transfer and Post-Processing:
- Allow the transfer to proceed for 6-24 hours, ensuring the wick remains wet.
- After transfer, dismantle the stack. The membrane will now contain the DNA pattern.
- Cross-linking: Immobilize the DNA onto the membrane by baking it at 80°C for 30-120 minutes (for nitrocellulose) or by exposing the nylon membrane to UV light. The membrane is now ready for prehybridization and probing [17].
Protocol B: Vacuum Blotting
This method offers a significant reduction in transfer time and can improve transfer efficiency.
Research Reagent Solutions & Essential Materials
- Membrane: Positively charged nylon membrane.
- Transfer Buffer: High-salt buffer, such as 20X SSC or NaOH-based solutions for simultaneous denaturation and transfer.
- Vacuum Blotter: A dedicated vacuum blotting apparatus with a sealed chamber and porous support screen.
- Vacuum Source: A pump capable of providing a stable, moderate vacuum (typically 5-7 cmHg or 20-60 mbar).
Step-by-Step Methodology:
Gel Preparation (Pre-transfer): The steps for depurination, denaturation, and neutralization are similar to the capillary method and may be required depending on the specific protocol and buffer used [39].
Apparatus Setup:
- Place the vacuum blotter on a stable surface and connect it to the vacuum source.
- Pre-wet the porous support screen with transfer buffer.
- Place the pre-cut, pre-wet membrane on the support screen, ensuring it covers the area under the gel.
Transfer Execution:
- Carefully place the gel on top of the membrane.
- Close the lid of the apparatus and apply a moderate vacuum as per the manufacturer's instructions. Excessive vacuum can compress the gel, hindering transfer [37].
- Slowly flood the chamber with enough transfer buffer to cover the gel.
- Allow the transfer to proceed for 60 minutes [17].
Post-Processing:
- After transfer, release the vacuum and open the apparatus.
- Remove the membrane and cross-link the DNA as described in the capillary protocol. The membrane is now ready for the next steps.
The Scientist's Toolkit
Table 2: Essential Materials for Membrane Transfer
| Item | Function | Recommendation |
|---|---|---|
| Positively Charged Nylon Membrane | Solid support that binds and immobilizes single-stranded DNA via electrostatic interactions. | BrightStar-Plus membranes for high signal-to-noise ratio [25]. |
| 20X SSC Buffer | High-salt transfer buffer that facilitates the movement of DNA from the gel to the membrane. | Standard for capillary transfer; ensures efficient DNA binding to the membrane [17]. |
| Vacuum Blotting Apparatus | Instrument that uses controlled suction to rapidly pull buffer and DNA through the gel onto the membrane. | Enables fast, consistent transfers in about an hour [17]. |
| HCl Solution | Used for optional gel depurination to fragment large DNA molecules for more efficient transfer. | Critical for transferring DNA fragments >15 kb [17]. |
| NaOH Solution | Denaturing agent that converts double-stranded DNA into single strands for optimal binding to the membrane and probe. | Essential step to prepare DNA for hybridization [17]. |
Within the framework of DNA sequence detection research, Southern blotting remains a definitive technique for analyzing genomic structure. The critical phase that determines the success of this method is the probe-based detection of specific DNA sequences immobilized on a membrane. This section provides detailed protocols and application notes for the design, labeling, and hybridization of DNA probes, which are essential for researchers and drug development professionals validating genetic modifications, diagnosing mutations, and conducting forensic analysis. The process involves creating a sequence-specific probe, incorporating a detectable label, and employing precise hybridization conditions to identify target DNA fragments within a complex genome [26] [9].
Probe Design Principles
The primary objective of probe design is to generate a reagent that is unique and specific to the target DNA sequence to avoid cross-hybridization with other genomic regions. A well-designed probe is fundamental to obtaining clear, interpretable results with minimal background.
- Design Strategy: Probes can be designed as internal probes that bind within the targeting construct (e.g., to common elements like the
lacZreporter orneoselectable marker) or external probes that bind to genomic sequences adjacent to, but not included within, the targeting construct. Internal probes are particularly useful for validating targeted alleles in large-scale projects, such as the generation of mouse mutants by the International Mouse Phenotyping Consortium (IMPC) [26]. - Probe Length and Uniqueness: For optimal labeling efficiency and signal strength, probes are typically 500-1000 base pairs in length. The probe sequence must be unique within the genome to prevent cross-hybridization. This is empirically confirmed by searching candidate probe sequences against the target genome using tools like BLAST, aiming for a single perfect match [27].
- Bioinformatic Automation: The manual process of probe design is labor-intensive. Automated bioinformatic pipelines, such as the one described by Smedley et al., can generate and score numerous candidate probes within a specified genomic window. These candidates are ranked based on a uniqueness score ratio (where a ratio >10 is desirable) and their content of repetitive DNA elements (ideally <5%) to predict high-performing probes before laboratory testing [27].
The following diagram illustrates the automated probe design and optimization workflow.
Probe Labeling Methodologies
Once a specific probe is designed, it must be labeled with a detectable tag. The choice between radioactive and non-radioactive methods depends on factors such as sensitivity requirements, safety regulations, and available detection equipment.
Radioactive Labeling
Radioactive labeling, often with ³²P, provides high sensitivity and is considered a gold standard.
- Protocol (Random Priming with ³²P): This method uses the Megaprime DNA Labeling System (or equivalent). Random sequence nonamers prime DNA synthesis on denatured template DNA. The primer-template complex is a substrate for the Klenow fragment of DNA Polymerase I, which incorporates radiolabeled [α-³²P]-dCTP into the newly synthesized DNA. The reaction mixture is incubated at 37°C for 10-60 minutes. The labeled probe is then separated from unincorporated nucleotides using a Sephadex G-50 spin column, collecting the high molecular weight fraction containing the incorporated label [40].
Non-Radioactive Labeling
Non-radioactive methods have been widely adopted due to safety concerns and the long shelf-life of reagents. Common labels include digoxigenin (DIG) and biotin.
- Digoxigenin Labeling: Digoxigenin-labeled nucleotides (e.g., DIG-dUTP) are incorporated into the probe via similar enzymatic reactions (random priming or PCR). The probe is then detected indirectly using an anti-digoxigenin antibody conjugated to an enzyme such as Horseradish Peroxidase (HRP). The enzyme catalyzes a chemiluminescent substrate (e.g., CDP-Star), which emits light upon exposure to X-ray film or an imaging system [26] [18].
- Biotin Labeling: Biotinylated nucleotides are incorporated into the probe and detected using enzyme-conjugated streptavidin (which has a high affinity for biotin), followed by a chemiluminescent or colorimetric reaction. The BrightStar BioDetect Kit is an example of a complete nonisotopic detection system optimized for use with biotinylated probes [18] [25].
Table 1: Comparison of Probe Labeling Methods
| Parameter | Radioactive (³²P) | Non-Radioactive (DIG/Biotin) |
|---|---|---|
| Typical Label | [α-³²P]-dCTP | DIG-dUTP or Biotin-dUTP |
| Detection Method | Autoradiography (X-ray film or phosphorimager) | Chemiluminescence or fluorescence |
| Sensitivity | High; can detect 0.1 pg of target DNA [17] | High; can be increased 100x with optimized buffers [25] |
| Probe Stability | Short (half-life-dependent) | Long (months to years) |
| Safety & Regulation | Requires specialized facilities and waste disposal | Generally safer, fewer restrictions |
| Time to Result | Longer exposure times (hours to days) | Rapid (results often within hours of substrate addition) |
Hybridization and Washing Protocols
Hybridization is the process whereby the labeled, single-stranded probe binds to its complementary DNA sequence immobilized on the membrane. This is a critical step that requires precise control of conditions to maximize specific binding and minimize background.
Pre-hybridization and Hybridization
Pre-hybridization is essential to block non-specific binding sites on the membrane.
- Pre-hybridization Buffer: A standard buffer may contain denatured fragmentation herring sperm DNA (or salmon sperm DNA) to occupy non-specific sites, Denhardt's solution (containing Ficoll, PVP, and BSA), SDS, and formamide in an SSC-based buffer [17] [40]. The membrane is incubated in this buffer for ≥1 hour at the hybridization temperature.
- Hybridization: The pre-hybridization buffer is replaced with a fresh, similar buffer containing the denatured, labeled probe. The use of specialized buffers like ULTRAhyb Ultrasensitive Hybridization Buffer can increase sensitivity up to 100-fold compared to standard solutions, potentially reducing the required hybridization time to just 2 hours for many targets [25]. Hybridization is typically performed in a sealed bag or tube in a shaking water bath, often at 65°C for standard Southern blots, though the temperature and stringency are adjusted based on the probe characteristics [40].
Post-Hybridization Washes
After hybridization, a series of washes removes the unhybridized and partially hybridized probe.
- Stringency Control: Washes are performed with increasing stringency, which is controlled primarily by the salt concentration (SSC) and temperature. Initial low-stringency washes (e.g., 2X SSC/0.1% SDS) remove the hybridization solution, while subsequent high-stringency washes (e.g., 0.1X SSC/0.1% SDS) at elevated temperatures (e.g., 65°C) remove partially matched hybridized probes, ensuring that only fully complementary sequences remain bound [25] [40].
- Membrane Types: The choice of membrane influences the protocol. Positively charged nylon membranes are more durable and have a higher DNA binding capacity than nitrocellulose. DNA is typically immobilized on nylon membranes by UV cross-linking [18] [17].
The workflow from hybridization to detection is summarized below.
Table 2: Key Research Reagent Solutions for Hybridization and Detection
| Reagent / Kit | Function / Application | Key Features |
|---|---|---|
| Herring Sperm DNA | Blocking agent in pre-hybridization | Blocks non-specific binding sites on the membrane to reduce background [40]. |
| ULTRAhyb Hybridization Buffer | Buffer for hybridization | Increases sensitivity up to 100x; allows for shorter hybridization times (e.g., 2 hours) [25]. |
| BrightStar-Plus Membranes | Positively charged nylon membrane | Ideal for use with radiolabeled and nonisotopic probes; high binding capacity [25]. |
| BrightStar BioDetect Kit | Detection of biotinylated probes | Complete system for nonisotopic detection; uses chemiluminescent CDP-Star substrate [25]. |
| Megaprime DNA Labeling System | Random priming for radioactive probes | Efficiently incorporates [α-³²P]-dCTP; includes columns for purification [40]. |
| DIG High Prime DNA Labeling Kit | Non-radioactive probe labeling | Incorporates digoxigenin-dUTP; detected with anti-DIG antibody conjugates [26]. |
Detection and Analysis
The final stage involves visualizing the hybridized probe to identify the target DNA fragments.
- Radioactive Probes: Membranes hybridized with ³²P-labeled probes are exposed to X-ray film in a cassette with an intensifying screen at -80°C or, more commonly, imaged using a phosphorimager for greater sensitivity and a wider dynamic range [18] [40].
- Non-Radioactive Probes: For chemiluminescent detection, the membrane is incubated with the appropriate substrate (e.g., for HRP). The resulting light emission is captured on X-ray film or by a digital imager capable of detecting chemiluminescence, such as the Azure Sapphire FL Biomolecular Imager or similar systems [18].
- Data Interpretation: The presence of a band of the expected molecular weight, as determined by a DNA ladder, confirms the presence of the target sequence. The number and size of bands provide information about the genomic structure, such as gene copy number, successful homologous recombination, or the presence of gene rearrangements [9].
The detection phase is the critical endpoint of a Southern blot experiment, where the specific DNA-probe hybrids are visualized and analyzed. The methodology is dictated by the label used on the nucleic acid probe, with the core principle being the generation of a measurable signal from the bound probe that correlates with the presence and abundance of the target DNA sequence [25] [41]. The two primary detection categories are autoradiography, used for radioactively labeled probes, and chemiluminescent detection, used for enzyme-linked probes [25]. The resulting data, typically an autoradiograph or a digital image, provides information on the identity, size, and relative quantity of the target DNA fragment[s].
Detailed Detection Methodologies
Detection via Autoradiography for Radiolabeled Probes
This traditional method offers high sensitivity and is detailed in current protocols for validating genome editing [20].
- Probe Labeling: The DNA probe is labeled with a radioactive isotope, most commonly Phosphorus-32 (³²P). Protocols utilize kits such as the Prime-It II Random Primer Labeling Kit for incorporating [α-³²P]-dCTP into the probe [20].
- Signal Capture:
- After hybridization and stringent washing, the moist membrane is sealed in a plastic wrap to prevent contamination and placed in an X-ray cassette [20].
- In a darkroom, a sheet of X-ray film (e.g., Carestream Biomax MS Film) is placed directly against the membrane [20].
- The cassette is sealed and stored at -80°C to enhance the sensitivity of the film. Exposure times can range from several hours to several days, depending on the signal strength [20].
- Image Development: The X-ray film is developed using standard photographic chemicals, resulting in dark bands on the film wherever the radioactive probe has bound to its target [42].
Detection via Chemiluminescence for Non-Radioactive Probes
Chemiluminescence is a widely adopted non-isotopic method that offers safety benefits and rapid results, with comprehensive kits available from commercial suppliers [25].
- Probe Labeling: Probes are typically labeled with haptens such as biotin or digoxigenin.
- Signal Generation Workflow: The multi-step process is optimized in kits like the BrightStar BioDetect Kit [25].
- Blocking: The membrane is incubated with a blocking solution to prevent nonspecific binding of subsequent reagents.
- Conjugate Binding: The membrane is incubated with a conjugate, most commonly Streptavidin-Alkaline Phosphatase (AP) for biotinylated probes. Streptavidin binds with high affinity to biotin, anchoring the AP enzyme to the probe-target hybrid.
- Substrate Incubation: The membrane is incubated with a chemiluminescent AP substrate, such as CDP-Star. AP dephosphorylates the substrate, converting it to an unstable intermediate that emits light as it decays [25].
- Signal Capture: The light emission is captured by exposing the membrane to X-ray film or, for greater sensitivity and linear dynamic range, a digital imaging system like a phosphorimager or a CCD camera [25].
Comparison of Detection Modalities
Table 1: Comparison of Southern Blot Detection Methods
| Feature | Autoradiography (³²P) | Chemiluminescence |
|---|---|---|
| Sensitivity | Very high (can detect ~0.1 pg of target DNA) [41] | High (comparable to radioactivity for many applications) [25] |
| Time to Result | Long (hours to days for exposure) | Rapid (minutes to a few hours) |
| Safety & Waste | Requires special handling, training, and radioactive waste disposal [20] | No special safety concerns beyond standard laboratory practice |
| Probe Stability | Short (half-life of isotope) | Long (probes can be stored for years) |
| Quantification | Possible with phosphorimagers | Excellent with digital imaging systems |
| Common Applications | High-sensitivity research, gold-standard validation [20] | Routine diagnostics, clinical applications, most research |
Data Analysis and Interpretation
Following detection, the resulting data must be accurately interpreted to draw biological conclusions.
- Sizing DNA Fragments: The distance the detected band has migrated on the gel is compared to a DNA ladder of known fragment sizes (e.g., 1 kb Plus DNA Ladder) run alongside the samples. A standard curve is generated by plotting the log of the molecular weight of the ladder fragments against their migration distance, allowing the size of the unknown fragment to be extrapolated [25].
- Determining Restriction Patterns: The presence or absence of restriction enzyme recognition sites is determined by the number and size of the fragments detected. The appearance of a novel band, in addition to the expected germline band, indicates a genetic rearrangement, such as a translocation or deletion [41].
- Assessing Abundance: The relative abundance of the target DNA sequence can be semi-quantified by the intensity of the band signal, typically measured by densitometry analysis of the image [25].
Research Reagent Solutions
Table 2: Essential Reagents for Southern Blot Detection
| Item | Function | Example Products & Notes |
|---|---|---|
| Random Primer Labeling Kit | Enzymatically incorporates labeled nucleotides into DNA probes for high-specific-activity labeling. | Prime-It II Random Primer Labeling Kit [20] |
| Radioactive Nucleotides | Provides the radioactive signal for autoradiography. | [α-³²P]-dCTP [20] |
| Biotin or Digoxigenin Labeling Kits | For safe, non-radioactive probe labeling; kits include nucleotides conjugated to haptens. | Various kits from ThermoFisher, Roche |
| Chemiluminescent Detection Kit | Complete system for block, conjugate, and substrate for non-radioactive detection. | BrightStar BioDetect Kit (optimized for BrightStar-Plus membranes) [25] |
| Alkaline Phosphatase Substrate | Chemiluminescent substrate that emits light upon enzyme activation. | CDP-Star substrate [25] |
| X-ray Film | For capturing and visualizing signals from both radioactive and chemiluminescent blots. | Carestream Biomax MS Film [20] |
| Hybridization Buffer | Solution that promotes specific and sensitive probe-target hybridization while minimizing background. | ULTRAhyb Ultrasensitive Hybridization Buffer [25] |
| Positively Charged Nylon Membrane | Solid support for immobilizing denatured DNA; essential for the blotting process. | BrightStar-Plus Membranes, Amersham Hybond XL [25] [20] |
Applications in Research and Drug Development
Despite the advent of PCR and NGS, Southern blotting remains a powerful tool for specific applications in basic research and clinical diagnostics [41] [43].
- Validation of Gene Rearrangements: It is considered the gold standard for assessing immunoglobulin or T-cell receptor gene rearrangements in leukemias and lymphomas, as it can scan thousands of base pairs of DNA for clonal populations [41].
- Analysis of Complex Genetic Loci: Southern blot is invaluable for detecting large deletions, insertions, or rearrangements where breakpoints are scattered over a large genomic region, making PCR primer design difficult [41].
- Validation of Genome Editing: In modern research, Southern blotting is used to confirm the structural integrity of a genomic locus following CRISPR/Cas9 or prime editing in human pluripotent stem cells, ensuring there are no large, unintended deletions or rearrangements (loss of heterozygosity) [20].
Experimental Protocol: Detection and Analysis
This protocol assumes completion of DNA digestion, gel electrophoresis, and membrane transfer.
Materials:
- Hybridized membrane (from Step 4).
- For Chemiluminescence: BrightStar BioDetect Kit or equivalent (Blocking solution, Streptavidin-AP Conjugate, Wash Buffer, Chemiluminescent Substrate) [25].
- For Autoradiography: X-ray film, developing chemicals, film cassette [20].
- Orbital shaker, plastic trays, autoradiography cassette, digital imaging system.
Method:
A. Chemiluminescent Detection [25]
- Washing: Perform post-hybridization stringency washes as required (e.g., with 0.1X SSC/SSPE).
- Blocking: Incubate the membrane with sufficient volume of Blocking Buffer for 30-60 minutes at room temperature with gentle agitation.
- Conjugate Incubation: Dilute the Streptavidin-Alkaline Phosphatase (SA-AP) conjugate as per kit instructions in the provided buffer. Incubate the membrane with the conjugate solution for 30 minutes with agitation.
- Washing: Remove unbound conjugate by washing the membrane multiple times in Wash Buffer.
- Substrate Incubation: Drain excess wash buffer. Incubate the membrane with the chemiluminescent substrate (e.g., CDP-Star) for 5 minutes at room temperature. Drain excess substrate.
- Signal Capture: Seal the moist membrane in a plastic wrap, ensuring no bubbles are trapped. Place in an X-ray cassette and expose to X-ray film for a series of durations (e.g., 1 min, 5 min, 30 min) or capture using a digital imager.
B. Autoradiography Detection [20]
- Washing: Complete stringency washes to remove unhybridized radioactive probe.
- Membrane Preparation: Blot the membrane dry and seal in plastic wrap.
- Exposure: In a darkroom, place the membrane in an X-ray cassette. Under safelight conditions, place a sheet of X-ray film over the membrane. Close the cassette and expose at -80°C for hours to days.
- Film Development: Develop the film using an automatic processor or manually with developer and fixer solutions.
Data Analysis:
- Sizing: Align the autoradiograph/image with a photograph of the ethidium bromide-stained gel containing the DNA ladder. Measure migration distances and plot the standard curve to determine the size of unknown fragments.
- Interpretation: Analyze the banding pattern for the presence of germline and/or rearranged alleles to draw conclusions about gene structure, rearrangements, or the success of genetic manipulations.
Workflow Visualization
Southern blotting, a seminal technique developed by Edwin Southern in 1975, remains a foundational method for the specific detection of DNA sequences within complex genomic backgrounds [44] [43]. While alternative technologies like PCR and next-generation sequencing have superseded it for many routine applications, Southern blotting retains critical importance in specific molecular characterization contexts where its unique capabilities are unmatched [3] [43]. This application note details the protocols and contemporary uses of Southern blotting within three key research domains: genotyping of complex loci, gene rearrangement studies, and transgene analysis. The technique's ability to provide quantitative information on DNA structure, copy number, and methylation status without prior amplification makes it particularly valuable for validating genetic modifications and diagnosing disorders involving large genomic alterations [3] [41].
Key Application Areas
Southern blotting provides indispensable data in molecular biology by directly analyzing DNA fragments separated by size and hybridized with specific probes. The following applications highlight its ongoing relevance in modern research and diagnostics.
Genotyping
Southern blotting enables precise genotyping of loci that are challenging for PCR-based methods, particularly those containing large tandem repeat expansions and regions with complex methylation patterns [3].
- Repeat Expansion Disorders: It is used diagnostically for conditions like myotonic dystrophy type 1 and fragile X syndrome, where it can determine the size of expansions too large to amplify by PCR [3]. The severity of these conditions often correlates with expansion size, making accurate sizing clinically valuable [3].
- Methylation Analysis: Using methylation-sensitive restriction enzymes, Southern blotting can determine the methylation status of genomic regions. This is crucial for conditions like fragile X syndrome, where methylation of the expanded allele silences the gene and is a key diagnostic feature [3].
Gene Rearrangement Studies
This technique excels at detecting structural variations in DNA, making it ideal for studying chromosomal rearrangements and somatic recombination events in both research and clinical pathology [41] [18].
- Hematological Malignancies: Southern blotting aids in detecting characteristic gene fusions in lymphomas and leukemias, such as those involving the immunoglobulin heavy chain (IGH) locus or the BCR/ABL translocation (Philadelphia chromosome) [41]. A novel rearranged band on a Southern blot, in addition to the germline band, indicates a clonal rearrangement [41].
- Cancer Genomics: The technique can identify gene amplifications, deletions, or rearrangements in cancer cells compared to normal cells. It is particularly useful for scanning large genomic regions (thousands of base pairs) to detect large deletions or complex rearrangements that might be difficult to assemble from short-read sequencing data [41].
Transgene Analysis
In the generation of genetically modified organisms (GMOs), Southern blotting is a gold-standard method for characterizing the integration of foreign DNA, providing critical data that PCR or sequencing alone may not fully capture [45] [46] [47].
- Copy Number Determination: It determines the number of transgene copies integrated into the host genome, a key factor influencing stable expression and preventing gene silencing [46] [47].
- Integration Structure Analysis: The technique reveals whether a transgene has integrated in a single locus or multiple loci, and whether the arrangement is tandem or complex [45]. It can confirm the structure of alleles generated by homologous recombination in animal models and identify random or multiple integrations [45].
- Regulatory Compliance: Detailed molecular characterization, including insertion site and T-DNA sequence, is often required for the risk assessment and regulatory approval of commercial GMOs [46].
Table 1: Key Characteristics of Southern Blotting Applications
| Application Area | Primary Objective | Typical Probe Target | Key Outcome Measure |
|---|---|---|---|
| Genotyping | Determine allele size and methylation status | Specific genomic locus (e.g., FMR1 gene for fragile X) | Fragment size (kb) compared to controls [3] |
| Gene Rearrangement Studies | Detect pathological DNA rearrangements | Genes or regions known to rearrange (e.g., IGH, BCR) | Presence/absence of novel restriction fragments [41] |
| Transgene Analysis | Confirm integration structure and copy number | Transgene sequence or flanking genomic DNA | Number and size of hybridizing fragments [45] [48] |
Experimental Protocol
This section provides a detailed core protocol for Southern blotting, which can be adapted for the specific applications mentioned above.
The following diagram illustrates the major steps in the Southern blotting process, from sample preparation to final detection.
Detailed Methodologies
DNA Digestion and Electrophoresis
- DNA Requirement: Typically 5-10 µg of high-molecular-weight genomic DNA is required, often extracted from fresh or frozen tissue [3] [41].
- Restriction Digestion: Digest DNA to completion using appropriate restriction enzymes (e.g., 10-20 units/µg DNA for 4-16 hours) [3]. For methylation analysis, select methylation-sensitive enzymes (e.g., HpaII) that cannot cut methylated DNA [3].
- Gel Electrophoresis: Size-fractionate digested DNA on a 0.7-1.0% agarose gel. Include a DNA molecular weight ladder and appropriate control samples (e.g., wild-type, known positive) [3] [41]. Run gel at ~1-2 V/cm until adequate separation is achieved.
Blotting and Hybridization
- Denaturation and Transfer: Soak the gel in 0.5M NaOH to denature DNA into single strands [41]. For fragments larger than 15 kb, a depurination step with HCl may be added to fragment DNA for more efficient transfer [41]. Transfer ssDNA onto a nylon or nitrocellulose membrane via capillary action or vacuum transfer [3] [41]. Nylon membranes are preferred for their higher binding capacity (~500 µg/cm) [41].
- Immobilization: UV-crosslink DNA to the membrane to create a permanent covalent bond [41].
- Probe Preparation and Hybridization: Prepare a labeled DNA probe complementary to the target sequence. Probes can be radiolabeled (e.g., ³²P) or non-radioactive (e.g., digoxigenin, biotin, fluorescent dyes) [3] [45] [18]. Denature the probe, add it to the membrane in a hybridization buffer, and incubate at the appropriate temperature to allow specific hybridization. A pre-hybridization step with non-specific DNA (e.g., salmon sperm DNA) is often used to block non-specific binding sites [43].
Washing and Detection
- Stringency Washes: Wash the membrane with buffers (e.g., SSC with SDS) to remove non-specifically bound probe. Temperature and salt concentration determine stringency and affect specificity [3].
- Detection: Detect bound probe based on the label. For radioactive probes, use X-ray film or phosphorimaging [18] [49]. For non-radioactive probes, use chemiluminescent substrates, colorimetric detection, or direct fluorescence imaging with systems like the Azure Sapphire FL [41] [18].
- Analysis: Compare the size of fragments in the patient/sample lane to the molecular weight ladder and controls to interpret results [3].
Table 2: Research Reagent Solutions for Southern Blotting
| Reagent / Material | Function | Examples & Notes |
|---|---|---|
| Restriction Enzymes | Cut DNA at specific sequences to generate defined fragments. | Selection depends on target; use methylation-sensitive enzymes (e.g., HpaII) for methylation studies [3]. |
| Agarose Gel | Sieve matrix to separate DNA fragments by size. | Standard concentration is 0.7-1.0% [3]. |
| Nylon Membrane | Solid support for immobilizing transferred DNA. | Preferred over nitrocellulose for higher binding capacity (500 µg/cm vs. 100 µg/cm) [41]. |
| Labeled DNA Probe | Molecule for hybridizing to and detecting the target sequence. | Can be radioactive (³²P) or cold (digoxigenin, biotin, fluorophores like iFluor dyes) [3] [45] [41]. |
| Hybridization Buffer | Solution enabling specific probe binding. | Contains salts, buffer, blocking agents; often includes denatured salmon sperm DNA to reduce background [43]. |
Data Interpretation
Accurate interpretation is critical for drawing valid conclusions from Southern blot data. The following pathway outlines the logical process for analyzing results across different applications.
Expected Results by Application
- Genotyping: In repeat expansion disorders, affected individuals show a fragment larger than the wild-type allele [3]. For methylation analysis, differential digestion patterns between methylated and unmethylated DNA reveal epigenetic status [3].
- Gene Rearrangement: A clonal population of cells with a rearrangement will show a novel band in addition to (heterozygous) or instead of (homozygous) the germline band from the normal allele [41].
- Transgene Analysis: A single-copy transgene integrated into a unique genomic location typically yields a single band when probed, though the exact pattern depends on the location of restriction sites. Multiple bands suggest multiple integration sites or copies [45] [46].
Technical Considerations
Advantages and Limitations
Southern blotting possesses a unique profile of strengths and weaknesses that must be considered during experimental planning.
Advantages:
- Does not rely on PCR, allowing for the detection and accurate sizing of large DNA rearrangements or repeat expansions that are too large to amplify [3].
- Provides quantitative information and can analyze multiple similar sequences (e.g., repetitive DNA) with a single probe [41].
- For some applications, like fragile X methylation analysis, it may be the only method that provides direct methylation status information, as alternative STR tests often assume methylation status without testing it [3].
- Remains a cost-effective alternative to NGS for specific, targeted questions, especially when exploring unsequenced DNA from unknown organisms [43].
Limitations:
- Requires a relatively large amount of high-quality input DNA (5-10 µg) compared to PCR-based methods [3] [41].
- Labour-intensive, time-consuming (several days), and not easily scalable for high-throughput analysis [3].
- Requires the use of specific restriction enzymes and prior knowledge of the target sequence for probe design [3].
- Use of radioactive probes (³²P) presents safety and disposal challenges, though non-radioactive alternatives are widely available [45] [18].
Comparison with Modern Technologies
While Southern blotting has been largely replaced for many applications, it maintains a niche role where its specific capabilities are required.
Table 3: Southern Blotting vs. Alternative Genomic Techniques
| Technique | Best For | Key Limitations vs. Southern |
|---|---|---|
| PCR / STR Analysis | High-throughput sizing of small to medium repeats. | Cannot amplify very large expansions [3]. |
| Next-Generation Sequencing (NGS) | Comprehensive discovery of sequence variation and structural changes. | Higher cost; may struggle with highly repetitive regions and large structural variations that require long-range context [46] [43]. |
| qPCR / ddPCR | Precise, high-sensitivity copy number variation (CNV) analysis. | Requires predesigned assays; provides indirect inference of structure versus direct visualization [46]. |
| Southern Blotting | Sizing large alterations, analyzing methylation with enzymes, visualizing complex integration structures directly. | Low throughput, high input DNA requirement, labour-intensive [3] [46]. |
Southern blotting remains a powerful and relevant technique in the molecular biologist's toolkit, particularly for the specialized applications of genotyping complex loci, studying gene rearrangements, and conducting detailed transgene analysis. Its unique ability to directly visualize and size specific DNA sequences within a complex genome without amplification provides a level of validation that is sometimes necessary to confirm findings from newer, more high-throughput technologies. When applied to the appropriate biological questions, Southern blotting delivers robust, quantitative data that continues to support critical advancements in research, clinical diagnostics, and biotechnology development.
Troubleshooting the Southern Blot: Solving Common Problems and Enhancing Results
Addressing Incomplete DNA Digestion and Inefficient Transfer
In DNA sequence detection research, the Southern blot remains a foundational technique for analyzing specific DNA fragments within a complex genomic background. Despite the advent of PCR-based methods, Southern blotting is indispensable for applications requiring the analysis of large DNA fragments, repeat expansions, and methylation status, as it does not rely on prior amplification [3]. However, the technique's reliability hinges on two critical and often problematic steps: complete restriction digestion of genomic DNA and efficient transfer of the resulting fragments from the gel to a solid membrane. Incomplete digestion can lead to misinterpretation of band sizes and false negatives, while inefficient transfer results in weak or absent signals, severely compromising data quality. This application note provides a detailed, evidence-based protocol to address these core challenges, ensuring robust and reproducible results for researchers and drug development professionals.
Troubleshooting Core Technical Challenges
Overcoming Incomplete DNA Digestion
Incomplete DNA digestion is frequently the primary source of aberrant results in Southern blotting. It can produce artifactual bands, obscure the true genomic structure, and complicate the diagnosis of genetic disorders [3]. A systematic approach to DNA preparation and enzyme selection is required to mitigate this.
DNA Purity and Quantity: The use of high-quality, high-molecular-weight genomic DNA is paramount. The standard protocol recommends digesting 10 µg of genomic DNA to ensure a sufficient quantity of the target sequence is available for subsequent detection [50] [51]. Contaminants from the DNA isolation process, such as salts, solvents, or detergents, can inhibit restriction enzyme activity. The protocol from [20] emphasizes thorough purification, including a final resuspension in TE buffer and slow solubilization at 56°C for 12-24 hours to ensure the DNA is fully dissolved and free of inhibitors.
Enzyme Selection and Reaction Conditions: The choice of restriction enzyme is strategic. For methylation-sensitive analyses, methylation-sensitive restriction enzymes must be selected, as their inability to cut methylated DNA provides information on the epigenetic status of the locus [3]. To ensure complete digestion, a significant excess of enzyme is used. The standard is 1-2 units of enzyme per microgram of DNA, with incubation at 37°C for a prolonged period, typically overnight (≥6 hours) [50] [20]. Scaling up the reaction volume to 50 µL can improve efficiency by diluting potential inhibitors.
Verification of Digestion: Before proceeding to electrophoresis, it is good practice to confirm digestion completeness. This can be done by running a small aliquot of the digested DNA (e.g., 100-200 ng) on a mini-gel alongside undigested DNA. A successful digest will appear as a smear, in contrast to the single, high-molecular-weight band of the undigested control.
Optimizing Membrane Transfer Efficiency
Inefficient transfer of DNA fragments from the gel to the membrane leads to a catastrophic loss of signal. The following steps are critical for a successful blot.
Gel Pre-treatment: Following electrophoresis, the DNA must be denatured and neutralized to render it single-stranded for optimal probe hybridization. This involves soaking the gel in a denaturation buffer (0.5 M NaOH, 1.5 M NaCl) for 45 minutes, followed by a neutralization buffer (e.g., 1 M Tris-HCl, 1.5 M NaCl, pH 7.4) for 1 hour [50] [52]. For large fragments (>10 kb), a depurination step using 0.25 M HCl for 30 minutes is introduced to cleave the DNA partially, facilitating the transfer of larger pieces [20] [52].
Transfer Method Selection and Setup: While several transfer methods exist, capillary transfer is the most common. The setup involves a stack of Whatman paper, the gel, the membrane, and a stack of absorbent paper towels, all saturated with a high-salt buffer like 20X SSC [51]. The transfer is allowed to proceed overnight. A key advancement is the use of downward capillary transfer systems (e.g., TurboBlotter), which use gravity to drive the buffer and are faster and reduce the risk of inhomogeneous transfer compared to traditional upward systems [52]. Ensuring no air bubbles are trapped between the gel and the membrane is critical for uniform transfer.
Immobilization: After transfer, the DNA must be permanently fixed to the membrane. This is achieved by baking the membrane at 80°C for 2-3 hours or through cross-linking via UV irradiation [50] [51]. This step prevents the DNA from washing off during the subsequent hybridization and stringency washes.
Table 1: Troubleshooting Guide for Common Southern Blotting Problems.
| Problem | Potential Cause | Solution |
|---|---|---|
| Incomplete Digestion | Inhibitors in DNA preparation, insufficient enzyme, short incubation. | Repurify DNA; use 1-2 U/µg enzyme; incubate overnight (≥6 h) [50] [20]. |
| High Background | Inadequate washing, non-specific probe binding. | Increase stringency of washes (e.g., lower salt, higher temperature); use Church buffer for hybridization [20] [53]. |
| Weak or No Signal | Inefficient transfer, degraded DNA, low probe activity. | Implement depurination step for large fragments; confirm DNA integrity; check probe labeling efficiency [20] [52]. |
| Diffuse Bands | Overloading of DNA, poor gel electrophoresis. | Do not exceed 10-15 µg DNA per lane; ensure low voltage during electrophoresis for better resolution [20]. |
Quantitative Data from Optimization Studies
Empirical data underscores the importance of methodological optimization. A study focused on increasing the sensitivity of Southern blotting using digoxigenin (DIG)-labelled probes systematically compared labelling methods. The results, summarized in Table 2, demonstrate that a modified random-primed labelling protocol yielded a significantly higher ratio of labelled to non-labelled probes compared to the standard method, directly enhancing detection sensitivity [53].
Furthermore, the choice of hybridization buffer profoundly impacts background noise. Engler-Blum et al. developed a phosphate-based buffer (similar to Church buffer) with modified phosphate and SDS concentrations to provide more stringent conditions, which significantly reduces nonspecific hybridization and background [53]. The protocol in [20] successfully uses Church buffer (1 mM EDTA, 0.5M NaPO4 pH 7.2, 7% SDS, 1% BSA) for hybridization, which is critical for achieving a clean signal.
Table 2: Optimization of DIG-Labelled Probe Efficiency [53].
| Probe Labelling Method | Template DNA | Labelling Ratio (Labeled:Non-labeled) | Key Outcome |
|---|---|---|---|
| Standard Random Primed | 300 ng | 1.6 | Baseline method with lower efficiency. |
| Modified Random Primed | 1 µg | 4.0 | Scaled-up reaction significantly improves labelling ratio. |
| PCR Labelling | 100 ng | 2.5 | Useful for smaller amounts of template DNA. |
Detailed Experimental Protocol
This protocol integrates the optimized steps discussed above to ensure complete digestion and efficient transfer.
Genomic DNA Digestion
- Digest Setup: In a 1.5-ml microcentrifuge tube, combine:
- Incubation: Incubate the reaction at 37°C for a minimum of 6 hours, preferably overnight [20].
- Enzyme Inactivation: After digestion, heat the reaction at 65°C for 20 minutes to denature the restriction enzymes [50].
Gel Electrophoresis and Blotting
- Gel Casting: Prepare a 0.8% agarose gel in 1x TAE or TBE buffer. For large fragments, a lower percentage gel may be preferable. Do not add ethidium bromide to the gel if using a nylon membrane, as it can interfere with transfer [52].
- Electrophoresis: Load the digested DNA alongside a DNA ladder (e.g., 1 kb ladder). Run the gel at a low voltage (e.g., 1.5 V/cm) for 16-17 hours to achieve optimal separation [39].
- Gel Pre-treatment:
- Depurination (Optional, for large fragments): Soak the gel in 0.25 M HCl for 30 minutes with gentle agitation [20] [52].
- Denaturation: Submerge the gel in Denaturation Buffer (0.5 M NaOH, 1.5 M NaCl) for 45 minutes at room temperature with slow rotation [50] [51].
- Neutralization: Replace the denaturation buffer with Neutralization Buffer (1 M Tris-HCl, 1.5 M NaCl, pH 7.4) and soak for 1 hour with rotation [52].
- Capillary Transfer:
- Set up a transfer stack as illustrated in the workflow diagram. Use 20X SSC as the transfer buffer.
- Assemble the stack in the following order from bottom to top: sponge, 3 sheets of Whatman 3MM paper (soaked in 20X SSC), the treated gel, the nylon membrane (pre-wet in water then 20X SSC), 3 more sheets of Whatman paper (soaked), a stack of paper towels, a glass plate, and a small weight.
- Allow the transfer to proceed overnight [51].
- Immobilization: Disassemble the stack. Rinse the membrane in 2X SSC to remove residual gel particles. Bake the membrane at 80°C for 2-3 hours or UV-cross-link it to permanently fix the DNA [50] [51].
Probe Labelling and Hybridization (Modified Random-Primed Method)
- Probe Denaturation: Add 25-50 ng of linear probe DNA to purified water in a total volume of 9 µl. Heat the tube in a boiling water bath (>95°C) for 10 minutes, then immediately place on ice [50].
- Labelling Reaction: Briefly spin the tube and add the components from a random primed DNA labelling kit (e.g., Roche) along with the modified nucleotide (e.g., DIG-11-dUTP or [α-32P]-dCTP). Incubate at 37°C for 1 hour (radioactive) or overnight (DIG) [50] [20].
- Purification: Purify the labeled probe using a spin column (e.g., Illustra ProbeQuant G-50 Micro Columns) to remove unincorporated nucleotides [20].
- Pre-hybridization and Hybridization:
- Place the membrane in a hybridization bottle with Church buffer (0.1-0.2 ml per cm² of membrane) [20]. Incubate at 42°C for 1 hour in a hybridization oven.
- Denature the purified probe at 95°C for 10 minutes and immediately place on ice. Add the denatured probe to the pre-hybridization buffer.
- Hybridize overnight at the appropriate temperature (often 42°C) [50].
- Membrane Washing and Detection:
- Wash the membrane twice with 2X SSC, 0.1% SDS for 15 minutes at room temperature.
- Perform two additional stringent washes with 0.2X SSC, 0.1% SDS for 15 minutes at 65°C [50].
- Detect the signal via autoradiography (radioactive probes) or chemiluminescence (DIG-labeled probes followed by anti-DIG antibody conjugated to alkaline phosphatase and a suitable substrate like CDP-Star) [20] [52].
Workflow Visualization
The following diagram illustrates the core Southern blotting procedure with key optimization points for digestion and transfer highlighted.
The Scientist's Toolkit: Essential Research Reagents
Table 3: Key Reagents for Southern Blot Optimization.
| Item | Function | Consideration |
|---|---|---|
| Restriction Enzymes | Sequence-specific cleavage of DNA. | Use methylation-sensitive enzymes for epigenetic studies; select enzymes that produce informative fragment sizes [3]. |
| Nylon Membrane | Solid support for immobilizing transferred DNA. | Positively charged nylon membranes offer superior DNA binding capacity and robustness for reprobing [50] [51]. |
| Church Buffer | Hybridization solution. | Phosphate-based buffer provides stringent conditions, reducing non-specific binding and background noise [20] [53]. |
| Digoxigenin (DIG) | Non-radioactive label for probe synthesis. | Avoids hazards of radioactivity; detected via anti-DIG antibody conjugated to alkaline phosphatase [50] [53]. |
| Random Primed DNA Labelling Kit | Incorporates labeled nucleotides into probe DNA. | A modified, scaled-up protocol increases the labelling ratio, enhancing sensitivity [53]. |
| TurboBlotter System | Downward capillary transfer apparatus. | Uses gravity for faster, more homogeneous DNA transfer from gel to membrane [52]. |
Strategies to Minimize Background Noise and Non-Specific Probe Binding
In the analysis of specific DNA sequences through Southern blotting, the clarity and reliability of the results are paramount. Background noise and non-specific probe binding represent significant challenges that can compromise data interpretation, leading to false positives or obscured results. Southern blotting, a technique pioneered by Edwin Southern in 1975, remains a valuable tool for detecting specific DNA sequences, characterizing genetic rearrangements, and determining gene copy number, despite the advent of newer technologies like PCR and next-generation sequencing [9] [43] [54]. The technique involves digesting genomic DNA with restriction enzymes, separating fragments by gel electrophoresis, transferring them to a membrane, and hybridizing with a labeled sequence-specific probe [9]. The process's effectiveness, however, hinges on implementing strategies that maximize the signal-to-noise ratio. This application note provides detailed protocols and reagent solutions framed within a comprehensive thesis on Southern blotting, offering researchers systematic approaches to minimize background artifacts and enhance detection specificity for critical applications in research and drug development.
Background signals in Southern blotting arise from multiple sources, each requiring specific intervention strategies. Non-specific probe binding occurs when the hybridization probe interacts with DNA sequences or membrane areas lacking perfect complementarity, often due to shared low-complexity regions or partial homology [9]. Inadequate blocking of the membrane surface prior to hybridization allows the probe to bind indiscriminately to the membrane matrix itself, creating a generalized background haze [9] [50]. Insufficient washing stringency post-hybridization fails to remove partially hybridized or loosely bound probes, while overexposure during detection can amplify weak non-specific signals to problematic levels [50].
Additional factors include incomplete DNA transfer causing trapped fragments in the gel, poor-quality reagents introducing contaminants, and probe over-concentration leading to saturation of specific and non-specific binding sites alike [50]. Membrane handling with bare hands can introduce oils and nucleases, while inefficient immobilization of DNA to the membrane may cause sample loss during aggressive washing steps [9] [50]. Understanding these diverse sources enables researchers to implement targeted strategies at each procedural stage, systematically minimizing noise while preserving specific signal intensity.
Material and Reagent Solutions
The following table catalogizes essential reagents and their optimized applications for minimizing background in Southern blotting:
Table 1: Key Research Reagent Solutions for Background Reduction
| Reagent/Material | Function & Optimization | Background Reduction Role |
|---|---|---|
| Nylon Membrane (charged) | Solid support for DNA immobilization [9] | Positively charged surface covalently binds negatively charged DNA, reducing wash-off |
| Salmon Sperm DNA | Blocking agent in pre-hybridization [9] [43] | Saturates non-specific membrane binding sites to prevent probe attachment |
| Formamide | Denaturing agent in hybridization buffers [50] | Enables lower hybridization temperatures, increasing stringency without fragmenting DNA |
| SDS (Sodium Dodecyl Sulfate) | Detergent in hybridization and wash buffers [50] | Disrupts hydrophobic interactions that cause non-specific probe adherence |
| SSC (Saline Sodium Citrate) | Salt solution in wash buffers [9] [50] | Controls stringency - lower salt concentrations increase stringency in washes |
| Digoxigenin-labeled dUTP | Non-radioactive probe label [50] [55] | Enables highly specific antibody-based detection, eliminating radioactive background |
| SSPE Buffer | Alternative to SSC in hybridization/washes [56] | Phosphate buffer enhances blocking of non-specific sites compared to citrate-based buffers |
Beyond these core reagents, several solutions require precise formulation for optimal performance. Denaturation buffer (typically 0.5M NaOH, 1.5M NaCl) must be freshly prepared to ensure complete DNA denaturation into single strands, while neutralization buffer (1.5M NaCl, 0.5M Tris-HCl, pH 7.4) stabilizes DNA for efficient transfer [50]. Pre-hybridization buffer often comprises 6× SSC, 5× Denhardt's solution, 0.5% SDS, and 100μg/ml denatured salmon sperm DNA, creating an environment that saturates non-specific binding sites before probe introduction [50]. For high-stringency washes, 0.1× SSC with 0.1% SDS at 65°C effectively removes partially matched hybrids while maintaining specific probe-target complexes [50].
Quantitative Comparison of Detection Methods
The choice of detection methodology significantly influences background levels and overall sensitivity in Southern blotting. The following table provides a comparative analysis of common detection systems:
Table 2: Quantitative Comparison of Southern Blot Detection Methods
| Detection Method | Sensitivity Range | Background Issues | Resolution Capability | Optimal Use Cases |
|---|---|---|---|---|
| Radioactive (³²P) | 1-10pg [57] | High with overexposure, requires careful exposure control [43] | High with phosphorimager [50] | Low-copy number detection, quantitative studies |
| Chemiluminescent | <0.5pg [55] | Medium; requires optimized blocking [55] | High with optimized protocols [55] | Most applications, especially when safety is concern |
| Colorimetric | 5-10pg | High with non-optimized substrate incubation | Lower than chemiluminescent | Educational settings, rapid qualitative assessment |
| Fluorescent | 1-5pg | Low with purified antibodies | High with specialized scanners | Multiplexing with multiple probes |
Recent advancements in nonradioactive detection have substantially improved performance. Research demonstrates that optimized chemiluminescence systems using digoxigenin-labeled probes with alkaline phosphatase-conjugated antibodies and dioxetane substrates can achieve higher sensitivity than traditional ³²P-based methods while virtually eliminating background problems that previously limited nonradioactive applications [55]. This system's effectiveness stems from the enzymatic amplification capability, which generates abundant signal molecules from each binding event, coupled with the structural stability of digoxigenin, which reduces non-specific interactions compared to haptens like biotin.
Optimized Southern Blot Protocol with Background Reduction
DNA Digestion and Electrophoresis
- DNA Digestion: Completely digest 10μg of high-quality genomic DNA using appropriate restriction enzymes (1-2 units/μg DNA) in recommended buffer at 37°C for overnight incubation to ensure complete fragmentation [50]. Incomplete digestion creates heterogeneous fragments that appear as smearing on the blot.
- Gel Electrophoresis: Size-fractionate digested DNA on a high-quality agarose gel (0.8-1.0%) using TAE or TBE buffer [56]. Include DNA molecular weight markers on both ends of the gel for accurate fragment sizing. Execute electrophoresis at low voltage (1-2V/cm) to prevent DNA smearing and ensure sharp band resolution [50].
DNA Denaturation, Neutralization and Transfer
- Denaturation: Following electrophoresis, incubate the gel in denaturation buffer (0.5M NaOH, 1.5M NaCl) for 45 minutes with gentle agitation [50]. This critical step separates double-stranded DNA into single strands for efficient probe hybridization.
- Neutralization: Replace denaturation buffer with neutralization buffer (1.5M NaCl, 0.5M Tris-HCl, pH 7.4) and incubate for 1 hour to restore pH to levels compatible with membrane binding [50].
- Capillary Transfer: Assemble a capillary transfer system using Whatman paper wicks, the gel, and a charged nylon membrane. Transfer DNA upward with 20× SSC buffer for a minimum of 16 hours to ensure complete and even transfer of all fragment sizes [9] [50]. Incomplete transfer, particularly of larger fragments, reduces signal intensity.
DNA Immobilization and Pre-hybridization
- Immobilization: Following transfer, cross-link DNA to the membrane using UV irradiation in a commercial cross-linker or bake at 80°C for 2 hours under vacuum to permanently affix DNA [9]. Proper immobilization prevents DNA loss during high-stringency washes.
- Pre-hybridization: Incubate the membrane in pre-hybridization buffer (6× SSC, 5× Denhardt's solution, 0.5% SDS, 100μg/ml denatured salmon sperm DNA) at 42°C for 1-4 hours in a hybridization oven [50]. This critical step blocks non-specific binding sites on the membrane surface using inert DNA and Denhardt's solution, significantly reducing background.
Probe Labeling and Hybridization
- Probe Labeling: Label 25-50ng of purified probe DNA using random primed labeling with digoxigenin-11-dUTP following manufacturer protocols [50] [55]. Denature the labeled probe at 95°C for 10 minutes immediately before use to ensure single-stranded状态.
- Hybridization: Replace pre-hybridization buffer with fresh buffer containing the denatured probe. Hybridize at 42°C for 16 hours with constant rotation in a hybridization oven [50]. These conditions balance hybridization kinetics with stringency, favoring specific matches over partial homologies.
Post-Hybridization Washes and Detection
- Stringency Washes: Perform sequential washes to remove non-specifically bound probe [50]:
- Low-stringency wash: 2× SSC, 0.1% SDS at room temperature for 15 minutes (removes excess probe)
- High-stringency wash: 0.1× SSC, 0.1% SDS at 65°C for 30-60 minutes (removes partially matched hybrids)
- Detection: For digoxigenin-labeled probes, incubate membrane with anti-digoxigenin antibody conjugated to alkaline phosphatase (1:10,000 dilution) followed by chemiluminescent detection using CSPD or CDP-Star substrates [50] [55]. Expose to X-ray film or capture with a digital imager for optimal sensitivity.
Troubleshooting Common Background Problems
Despite meticulous technique, background issues may persist. The following table outlines common problems and evidence-based solutions:
Table 3: Troubleshooting Guide for Background and Non-Specific Binding
| Problem Manifestation | Potential Causes | Verified Solutions |
|---|---|---|
| High overall background | Inadequate blocking, dirty membrane handling, contaminated reagents | Increase salmon sperm DNA concentration to 200μg/ml; use fresh Denhardt's solution; handle membrane with gloves [9] [50] |
| Dark spots or blotches | Uneven blocking, air bubbles during transfer or hybridization, precipitate in buffer | Ensure complete membrane submersion during blocking; remove all air bubbles during transfer; filter hybridization buffer [50] |
| High background with specific samples | Partial DNA degradation, insufficient restriction digestion | Verify DNA integrity pre-digestion; extend restriction enzyme incubation; increase enzyme concentration [50] |
| Non-specific bands | Wash stringency too low, probe concentration too high, hybridization temperature too low | Increase wash temperature to 68°C; reduce probe concentration by 50%; increase hybridization temperature [9] [50] |
| Patchy or uneven signal | Uneven transfer, poor membrane contact during hybridization | Ensure even weight distribution during capillary transfer; use hybridization bottles instead of bags [50] |
For persistent background issues despite protocol optimization, consider systematic evaluation of each component. Test membrane-only controls (without DNA) identify problematic batches of membranes or contaminated buffers. Hybridize without probe to detect non-specific antibody binding in nonradioactive detection systems. Reduce probe concentration incrementally, as excess probe saturates both specific and non-specific binding sites. When using chemiluminescent detection, optimize antibody concentration and ensure thorough washing after antibody incubation to remove unbound conjugate [55].
Minimizing background noise and non-specific probe binding in Southern blotting requires integrated optimization across all procedural stages, from DNA preparation through final detection. The strategies detailed in this application note—including rigorous blocking protocols, precise stringency control, modern nonradioactive detection systems, and systematic troubleshooting—enable researchers to achieve exceptional sensitivity and specificity. Implementation of these evidence-based approaches ensures that Southern blotting remains a robust, reliable method for DNA analysis in basic research and drug development contexts, producing publication-quality data with minimal artifacts. As molecular techniques continue to evolve, these fundamental principles of hybridization specificity and background control maintain their relevance across diverse analytical platforms.
Optimizing Hybridization Stringency and Washing Conditions for Specificity
This application note provides a detailed guide for optimizing hybridization stringency and washing conditions in Southern blotting to achieve high-specificity detection of target DNA sequences. Stringency determines the ability to discriminate perfectly matched hybrids from mismatched sequences, which is a cornerstone of accurate data interpretation in molecular research and diagnostic assay development. We outline the fundamental principles governing stringency, provide step-by-step protocols for wash buffer preparation and execution, and present troubleshooting guidance for common challenges. Within the broader context of DNA sequence detection research, proper stringency control ensures reliable validation of genetically modified alleles, accurate analysis of gene rearrangements in cancer studies, and precise characterization of tandem repeat expansions in neurological disorders, making it an essential technique for researchers and drug development professionals.
Southern blotting remains a foundational technique for detecting specific DNA sequences within complex genomes, particularly for applications where alternative methods like PCR face limitations [3] [41]. The technique's utility persists in validating homologous recombination events in genetically engineered models, analyzing gene rearrangements in hematological malignancies, and characterizing large tandem repeat expansions in neurological disorders where amplification is challenging [26] [41]. The specificity of Southern blot detection hinges critically on the precise control of hybridization stringency during washing steps.
Stringency refers to the set of conditions that determine the stability of nucleic acid duplexes during hybridization and subsequent washing procedures [58]. High stringency conditions ensure that only perfectly complementary nucleic acid sequences remain hybridized, while weakly bound or mismatched sequences dissociate. For research aimed at discriminating between highly similar sequences—such as mutant versus wild-type alleles or rearranged versus germline configurations—stringency optimization is not merely beneficial but essential for generating reliable, interpretable data. This document provides researchers with both the theoretical framework and practical protocols necessary to systematically optimize these critical parameters for specific experimental applications.
Theoretical Principles of Stringency Control
Fundamental Parameters Affecting Hybrid Stability
The stability of nucleic acid hybrids depends primarily on two physical chemical parameters: temperature and salt concentration [58]. Understanding how these factors influence the hydrogen bonding between complementary strands and the electrostatic repulsion of the sugar-phosphate backbones is fundamental to controlling stringency.
Temperature: Higher thermal energy disrupts hydrogen bonds between base pairs. Since perfectly matched sequences have more hydrogen bonds than mismatched pairs, elevated temperatures preferentially destabilize imperfect hybrids [58]. For example, in Southern blotting procedures, wash steps at 65°C or higher are commonly employed to enhance specificity [58].
Salt Concentration: Salt ions, particularly sodium (Na⁺) from SSC buffers, neutralize the negative charges on phosphate groups in the DNA backbone, thereby reducing electrostatic repulsion between complementary strands [58]. Lower salt concentrations diminish this shielding effect, increasing repulsion and making it easier for imperfectly matched sequences to dissociate while perfectly matched duplexes remain stable due to their greater hydrogen bonding.
Table 1: Effects of Stringency Parameters on Hybrid Stability
| Parameter | Change | Effect on Hybrid Stability | Effect on Specificity | Mechanism |
|---|---|---|---|---|
| Temperature | Increase | Decreases | Increases | Disrupts hydrogen bonds, preferentially affecting mismatched pairs |
| Temperature | Decrease | Increases | Decreases | Stabilizes all hybrids, including mismatched sequences |
| Salt Concentration | Increase | Increases | Decreases | Neutralizes phosphate repulsion, stabilizing imperfect matches |
| Salt Concentration | Decrease | Decreases | Increases | Increases repulsion, destabilizing weaker hybrids |
Optimizing Parameters for Specific Detection
To increase stringency for the detection of only perfectly matched hybrids, researchers should simultaneously raise the temperature and lower the salt concentration of wash buffers [58]. This combination creates conditions where only the strongest base-pair interactions persist. Conversely, lowering temperature and raising salt concentration decreases stringency, which may be desirable when seeking to detect related but not identical sequences [58].
The transition between low and high stringency conditions is typically achieved through a series of washes with progressively lower salt concentrations. Standard protocols often begin with low stringency washes (e.g., using 2X SSC) to remove unhybridized probe and excess hybridization buffer, followed by high stringency washes (e.g., using 0.1X SSC or SSPE) to remove partially hybridized probe molecules [25]. The judicious application of these principles allows researchers to fine-tune detection specificity according to their experimental requirements.
Experimental Protocols for Stringency Optimization
Standardized Southern Blotting and Hybridization Workflow
The following workflow illustrates the complete Southern blotting procedure with emphasis on the critical hybridization and washing steps where stringency control is implemented:
Pre-hybridization and Hybridization Protocol
Objective: To block non-specific binding sites on the membrane and incubate with labeled probe under conditions that promote specific hybridization.
Reagents and Solutions:
- ULTRAhyb Ultrasensitive Hybridization Buffer or equivalent [25] [59]
- Church buffer (1 mM EDTA, 0.5M NaPO₄ pH 7.2, 7% SDS, 1% BSA) [20]
- Denatured, fragmented herring sperm DNA (10 mg/mL) [40]
- Labeled DNA probe (radiolabeled or chemiluminescent)
Procedure:
- Pre-hybridization: Place the membrane containing immobilized DNA in a hybridization tube or sealable bag. Add an appropriate volume of pre-warmed hybridization buffer (approximately 0.1 mL per cm² of membrane) containing 100 μg/mL denatured herring sperm DNA [40]. Incubate with continuous agitation for 1-2 hours at the hybridization temperature.
Probe Preparation: Denature the labeled probe by heating to 95-100°C for 5 minutes, then immediately place on ice. Add the denatured probe directly to fresh, pre-warmed hybridization buffer, avoiding direct contact with the membrane.
Hybridization: Replace the pre-hybridization buffer with the probe-containing hybridization buffer. Incubate with continuous agitation for 12-16 hours at the appropriate temperature (typically 42-65°C depending on probe characteristics) [25] [40].
Critical Notes:
- Hybridization buffers containing accelerants such as dextran sulfate or polyethylene glycol increase the effective probe concentration and enhance signal intensity for single-copy gene detection [40].
- The use of optimized hybridization buffers like ULTRAhyb can increase sensitivity up to 100-fold compared to standard formamide-based buffers [59].
Washing Protocol for Stringency Optimization
Objective: To remove unbound and non-specifically bound probe while retaining perfectly matched hybrids through controlled stringency conditions.
Reagents and Solutions:
- 20X SSC stock solution (3.0 M NaCl, 0.3 M sodium citrate, pH 7.0) [40] [60]
- 10% SDS solution
- Wash buffers as specified in Table 2
Table 2: Standard Wash Buffer Formulations for Stringency Control
| Stringency Level | SSC Concentration | SDS Concentration | Typical Temperature | Purpose |
|---|---|---|---|---|
| Low Stringency | 2X SSC | 0.1% SDS | Room Temperature | Remove hybridization solution and unbound probe |
| Intermediate Stringency | 1X SSC | 0.1% SDS | 42-55°C | Reduce non-specific background |
| High Stringency | 0.1X-0.3X SSC | 0.1% SDS | 55-68°C | Remove partially matched hybrids |
Procedure:
- Low Stringency Wash: Following hybridization, pour off the hybridization solution and add an ample volume of 2X SSC/0.1% SDS to cover the membrane. Wash at room temperature for 5-10 minutes with gentle agitation. Repeat once [25].
Intermediate Stringency Wash (Optional): Replace with 1X SSC/0.1% SDS. Wash at 42-55°C for 15-20 minutes with agitation. This step may be omitted for applications requiring maximum specificity.
High Stringency Wash: Replace with 0.1X-0.3X SSC/0.1% SDS. Wash at the predetermined optimal temperature (typically 55-68°C) for 20-30 minutes with agitation [25] [40]. Monitor background signal and repeat if necessary.
Final Rinse: Briefly rinse the membrane in an appropriate detection buffer to remove SDS residues that might interfere with signal detection.
Critical Notes:
- The exact salt concentration and temperature for high stringency washes should be empirically determined for each probe-target combination.
- Higher wash temperatures generally require lower salt concentrations to achieve equivalent stringency [58].
- For membranes that will be reprobed, more stringent conditions can be applied during the stripping process using 0.1X SSC/0.5% SDS at high temperature [40].
Research Reagent Solutions for Southern Blotting
Table 3: Essential Reagents for Stringency Optimization in Southern Blotting
| Reagent Category | Specific Examples | Function in Stringency Control |
|---|---|---|
| Membranes | BrightStar-Plus Positively Charged Nylon Membrane [25] [59] | Provides consistent DNA binding capacity essential for reproducible washing results |
| Hybridization Buffers | ULTRAhyb Ultrasensitive Hybridization Buffer [25] [59] | Maximizes hybridization efficiency while permitting subsequent high stringency washing |
| Salt Solutions | 20X SSC (3M NaCl, 0.3M sodium citrate) [40] [60] | Standardized stock solution for precise preparation of wash buffers at different stringencies |
| Detergents | 10% SDS Solution [40] [20] | Disrupts hydrophobic interactions during washing, reducing non-specific probe binding |
| Blocking Agents | Denatured Herring Sperm DNA [40] | Occupies non-specific binding sites on membrane before probe addition |
| Probe Labeling Systems | Megaprime DNA Labeling System [40], Prime-It II Random Primer Labeling Kit [20] | Generates high-specific-activity probes that withstand stringent washing conditions |
Troubleshooting Common Stringency-Related Issues
Excessive Background Signal
Potential Causes and Solutions:
- Insufficient blocking during pre-hybridization: Increase concentration of blocking agent (herring sperm DNA) or extend pre-hybridization time [40].
- Incomplete removal of unincorporated nucleotides from probe purification: Implement more rigorous purification using Sephadex G-50 columns or equivalent methods [40].
- Inadequate low-stringency washing: Increase volume or duration of initial washes with 2X SSC/0.1% SDS before proceeding to high stringency conditions [25].
Weak or Absent Target Signal
Potential Causes and Solutions:
- Excessive stringency: Reduce wash temperature or increase salt concentration in high stringency wash. Implement a more gradual stringency transition [58].
- Insufficient probe concentration or specific activity: Verify probe labeling efficiency and increase amount of probe added to hybridization buffer [40].
- DNA crosslinking issues: Optimize UV crosslinking conditions if using nylon membranes, as overexposure can reduce hybridization efficiency [60].
Non-Specific Band Detection
Potential Causes and Solutions:
- Insufficient stringency: Increase wash temperature and/or decrease salt concentration in final wash steps [58].
- Probe contamination with vector or non-target sequences: Repurify probe template or use gel-extracted fragments for labeling [20].
- Unexpected sequence homology: Perform database analysis of probe sequence to identify potential cross-hybridizing targets and adjust stringency accordingly.
Advanced Applications and Contemporary Relevance
Despite the emergence of PCR-based techniques, Southern blotting maintains unique advantages for specific applications in basic research and drug development. The technique remains particularly valuable for:
Validation of genetically engineered models: Southern blotting provides unambiguous information about the structure of targeted alleles in embryonic stem cells and mouse models, with stringency control essential for distinguishing homologous recombination events from random integrations [26].
Analysis of complex loci: For genes with highly homologous family members or pseudogenes, optimized stringency conditions enable specific detection of the intended target without cross-reaction [41].
DNA methylation studies: Using methylation-sensitive restriction enzymes coupled with Southern blotting under controlled stringency conditions allows analysis of epigenetic modifications at specific loci [3].
Gene rearrangement studies: In hematological malignancies, Southern blotting with appropriate stringency control can detect clonal rearrangements of immunoglobulin or T-cell receptor genes, with applications in both basic research and diagnostic assay development [41].
For these applications, the principles of stringency optimization outlined in this document remain essential for generating reliable, interpretable data that can inform research conclusions and therapeutic development decisions.
The precise control of hybridization stringency through manipulation of temperature and salt concentration during washing steps represents a critical determinant of success in Southern blotting experiments. The protocols and guidelines presented here provide researchers with a systematic approach to optimizing these parameters for specific experimental needs. As Southern blotting continues to find application in validation of genetically engineered models, analysis of complex genetic loci, and characterization of gene rearrangements, mastery of stringency optimization remains an essential skill for molecular biologists and translational researchers. Through careful implementation of these principles, researchers can achieve the specificity necessary to answer challenging biological questions with confidence.
Automated Probe Design and Bioinformatic Tools for Enhanced Performance
Southern blotting remains a definitive technique in molecular biology for detecting specific DNA sequences, playing a critical role in gene discovery, mutation detection, transgene integration validation, and DNA fingerprinting [27] [2]. The technique involves the use of a labeled DNA probe to hybridize to a target DNA sequence that has been separated by gel electrophoresis [9]. The success of this method hinges on the probe's ability to uniquely identify its target locus without cross-hybridizing to other genomic sequences [27]. This application note explores the integration of bioinformatic tools and automated pipelines to optimize genomic Southern blot probe design, thereby enhancing experimental performance and reliability for researchers and drug development professionals.
The Critical Role of Probe Design in Southern Blotting
The specificity of a Southern blot is fundamentally determined by the probe's design. A probe must be unique to the target locus to avoid cross-hybridization with other endogenous DNA sequences, which can cause intense background smearing and obscure specific hybridization signals [27]. Traditionally, investigators have employed a manual design process involving genome browsers to extract sequences of interest followed by BLAST-like searches against the target genome. This iterative process is labor-intensive, often requiring multiple attempts to identify a suitable probe that produces a single perfect match to the target with minimal cross-reactivity caused by homologous sequences or repetitive elements [27].
Southern blotting has proven particularly valuable as a confirmatory method in diagnostic and research applications, including the detection of gene fusions in hematological malignancies and the validation of gene targeting experiments [2]. However, its effectiveness depends on using probes adjacent to suspected breakpoints, and translocations with multiple breakpoints may require numerous probes and enzyme digestions, making the process costly and time-consuming without proper design optimization [2].
Automated Bioinformatics Pipelines for Probe Design
Brute-Force Tiling Algorithm
To address the limitations of manual probe design, an automated informatics pipeline employs a brute-force strategy that generates numerous candidate probes within a user-specified genomic window [27] [61]. The algorithm begins with the maximum allowable probe length (default 1300 bp), systematically tiling the design window by moving a small percentage of the probe length each time (default 5%). The probe length is then reduced iteratively (e.g., by 50 bases) and the window is re-tiled, repeating this process until the minimum probe length (default 500 bp) is reached [61]. This approach generates approximately 900 candidate probes for a 3 kb input window, creating a comprehensive set of candidates for subsequent analysis [61].
Genome-Wide Specificity Screening
Each candidate probe undergoes rigorous computational screening against the target genome using the Exonerate pairwise sequence alignment program with parameters optimized for local alignment (--model affine:local --score 150) [27] [61]. This critical step identifies all potential hybridization sites for each candidate probe throughout the genome, enabling the quantification of potential cross-hybridization events that could compromise experimental specificity.
Probe Scoring and Selection Metrics
The pipeline employs a dual-mechanism scoring system to evaluate and rank candidate probes:
- Uniqueness Score Ratio: Calculated from the alignment scores of the 'self-hit' (perfect match to target locus) versus the highest-scoring off-target alignment. A minimum score ratio of 10 is typically required for probe acceptance [27] [61].
- Repetitive DNA Content: Determined by comparing probe sequences against RepeatMasker and DUST-filtered genomic assemblies to identify repetitive and low-complexity regions. A maximum threshold of 5% repetitive/low-complexity content is generally enforced [27] [61].
Table 1: Performance Metrics of Manually-Designed Southern Blot Probes Used for Pipeline Calibration
| Probe Name | Gene Target | Length (bp) | Score Ratio | Repetitive DNA (%) |
|---|---|---|---|---|
| Dusp65primeprobe | Dusp6 (5') | 946 | 30.1 | 3.2 |
| SAP1025primePDZ3_probe | Dlg3 (5' PDZ3) | 969 | 27.2 | 2.7 |
| Dusp63primeprobe | Dusp6 (3') | 1004 | 29.4 | 4.5 |
| actb_probe | Actb | 881 | 22.8 | 6.7 |
| SAP1023primeprobe | Dlg3 (3') | 886 | 22.2 | 19.4 |
| NR2B_probe | Grin2b | 567 | 11.1 | 9.5 |
| Average | 791.6 | 19.5 | 18.2 |
The scoring thresholds were established based on a calibration set of eight manually-designed probes that had been experimentally validated to work effectively in Southern blot applications (Table 1) [61]. These calibration probes demonstrated an average uniqueness score ratio of 19.5 and contained approximately 18% repetitive DNA content, though the automated pipeline employs more stringent thresholds to optimize future performance [27].
Workflow Architecture
The automated design process employs a distributed computing architecture to manage the computational burden of genome-wide searches:
- Database Integration: A MySQL database stores design specifications, candidate probes, and genome search results, facilitating efficient data retrieval and analysis [27].
- Parallel Processing: The genome searching tasks are distributed across multiple processors and cores, significantly reducing real-time computation requirements [27].
- Modular Design: Three principal components comprise the pipeline: (1) candidate probe generation, (2) parallelized genome searching, and (3) results analysis with filtering and ranking [27].
The following workflow diagram illustrates the automated probe design process:
Experimental Validation and Performance
Validation of Automated Designs
The automated pipeline has been experimentally validated through Southern blotting experiments in the mouse genome. The majority of tested probes performed well, confirming the predictive value of the in silico scoring methodology [27] [61]. Notably, the automated designs frequently outperformed manual designs in both specificity metrics and experimental performance, while substantially reducing design time from hours to minutes [27].
Performance Across Genomic Loci
The automated system successfully designed probes for 124 distinct genomic regions with varying characteristics [61]. The performance data demonstrates the pipeline's adaptability across different chromosomal contexts:
Table 2: Performance Summary of Automated Southern Blot Probe Designs Across Various Genomic Loci
| Design Characteristic | Range | Representative Results |
|---|---|---|
| Genomic Design Window | 647 - 16,430 bp | Varies by locus complexity |
| Best Probe Length | 350 - 1,300 bp | Adapts to local sequence |
| Success Rate | 0 - 100% | Dependent on locus uniqueness |
| Candidate Probes per Kilobase | 50.9 - 443.6 | Higher density in complex regions |
Analysis of the 124 automated designs revealed that successful probe identification heavily depends on the genomic context. While some regions yielded numerous high-quality candidates (e.g., up to 100% success rate), others, particularly those with high sequence similarity to other genomic loci, produced no passing probes even with relaxed thresholds [61]. This honest assessment of limitations provides researchers with realistic expectations for challenging genomic targets.
Detailed Southern Blot Protocol with Automated Probes
Probe Generation and Labeling
Step 1: Probe Generation via PCR
- Primer Design: The automated pipeline generates PCR primers using Primer3 [27] to facilitate recovery of the optimized probe sequence from genomic DNA.
- PCR Amplification: Use high-fidelity DNA polymerase (e.g., AccuPrime Taq DNA Polymerase) with the following reaction setup [20]:
- Genomic DNA template: 100-200 ng
- Forward and reverse primers: 1 µL each (10 µM stock)
- PCR buffer: 5 µL
- DNA polymerase: 0.2 µL (1U)
- Molecular grade water to 50 µL final volume
- Thermocycling Conditions [20]:
- Initial denaturation: 94°C for 2 minutes
- 30 cycles of: 94°C for 30 seconds, 58°C for 30 seconds, 68°C for 1 minute/kb
- Final extension: 68°C for 10 minutes
- Hold at 16°C
- Product Purification: Verify PCR product purity by agarose gel electrophoresis (0.8% gel) and purify using a gel extraction kit according to manufacturer's instructions [20].
Step 2: Probe Labeling
- Employ random primer labeling with kits specifically designed for probe generation (e.g., Prime-It II Random Primer Labeling Kit) [20].
- Incorporate radiolabeled nucleotides (e.g., [α-32P]-dCTP) following standard radioactive safety protocols and manufacturer's instructions [20].
- Remove unincorporated nucleotides using size exclusion columns (e.g., Illustra ProbeQuant G-50 Micro Columns) [20].
DNA Digestion, Electrophoresis, and Blotting
Step 3: Genomic DNA Preparation and Digestion
- Extract high-quality genomic DNA from target cells or tissues using appropriate lysis buffers (e.g., Tris-Cl pH 8.5, EDTA, NaCl, SDS with proteinase K) [20].
- Perform restriction digestion with optimized enzymes [9] [20]:
- Genomic DNA: 10-15 µg
- Restriction enzyme: 4U per 1 µg DNA
- Appropriate buffer: 5 µL
- Molecular grade water to 50 µL final volume
- Incubate at enzyme-specific temperature (typically 37°C) for 6 hours to overnight
Step 4: Gel Electrophoresis and Membrane Transfer
- Separate digested DNA fragments by electrophoresis on a 0.8% agarose gel [20].
- Include appropriate molecular weight markers (e.g., 1 kb ladder) for size reference [20].
- Depurinate DNA (if fragments >15 kb) using 0.25M HCl [9].
- Denature DNA by incubating gel in alkaline solution (0.5M NaOH, 1.5M NaCl) [9].
- Transfer DNA to solid membrane (nylon or nitrocellulose) using capillary, vacuum, or electrophoretic transfer methods [9].
- Immobilize DNA on membrane by baking at 80°C for 2 hours or UV crosslinking [9].
Hybridization and Detection
Step 5: Membrane Hybridization
- Pre-hybridize membrane with Church buffer (1mM EDTA, 0.5M NaPO4 pH 7.2, 7% SDS, 1% BSA) to block non-specific binding sites [20].
- Hybridize with labeled probe in appropriate hybridization buffer at optimized temperature.
- Wash membrane with SSC buffer to remove non-specifically bound probe [9].
Step 6: Detection and Analysis
- Visualize hybridization pattern using autoradiography (for radioactive probes) or chromogenic detection methods [9].
- Interpret results by comparing fragment sizes in experimental samples to controls and molecular weight markers [2] [3].
- Identify specific DNA rearrangements, gene copy number variations, or mutations based on fragment size patterns [2].
The Scientist's Toolkit: Essential Research Reagents
Table 3: Essential Research Reagents for Southern Blotting with Automated Probe Designs
| Reagent/Category | Specific Examples | Function/Purpose |
|---|---|---|
| Bioinformatics Tools | Automated Southern Blot Pipeline, Ensembl API, Exonerate, RepeatMasker | In silico probe design, genome analysis, and specificity validation |
| DNA Polymerases | AccuPrime Taq DNA Polymerase (High Fidelity) | High-fidelity amplification of probe sequences from genomic DNA |
| Restriction Enzymes | PvuII, NdeI, AseI, EcoNI, SapI, SphI (enzyme choice target-dependent) | Digestion of genomic DNA into analyzable fragments |
| Membranes & Transfer | Amersham Hybond XL (nylon), nitrocellulose | Immobilization of size-separated DNA for hybridization |
| Labeling Systems | Prime-It II Random Primer Labeling Kit, [α-32P]-dCTP, non-radioactive alternatives | Probe tagging for detection and visualization |
| Hybridization Buffers | Church buffer (EDTA, NaPO4, SDS, BSA) | Optimization of hybridization specificity and signal-to-noise ratio |
| Detection Systems | Carestream Biomax MS Film, fluorescent/chromogenic substrates | Visualization of hybridization results |
The integration of automated bioinformatic pipelines for Southern blot probe design represents a significant advancement in molecular biology methodology. By employing brute-force generation of candidate probes coupled with rigorous genome-wide specificity screening, these tools consistently produce optimized probes that outperform manually designed alternatives while drastically reducing design time. The systematic approach to evaluating probe uniqueness and repetitive element content results in higher success rates in experimental applications. For researchers pursuing DNA sequence detection studies, particularly in complex genomic contexts or high-throughput environments, adopting these automated design methodologies provides enhanced performance, reliability, and efficiency in Southern blot-based research and diagnostic applications.
Southern Blotting in the Modern Lab: Validation, Comparison, and Niche Applications
Southern blotting, a technique pioneered by Edwin Southern in 1975, remains a definitive method for specific DNA sequence detection within complex biological samples [9]. This method combines the separation of DNA fragments via gel electrophoresis with their subsequent transfer to a solid membrane and detection using labeled, sequence-specific probes [9] [25]. Despite the advent of PCR and next-generation sequencing (NGS), Southern blot analysis maintains its status as a gold standard technique in applications requiring precise DNA structural analysis, particularly in the regulatory frameworks governing cell bank characterization and gene therapy development [62] [41]. Its ability to analyze DNA structure without prior knowledge of the sequence, to detect rearrangements, and to confirm the integrity of genetic constructs in a quantitative manner makes it indispensable for quality control in biomanufacturing [62]. This application note details the protocols and applications of Southern blotting, underscoring its critical role in ensuring the safety and efficacy of biological products.
Principles and Applications
Core Principle of Southern Blotting
The fundamental principle of Southern blotting involves the specific hybridization of a labeled DNA probe to its complementary DNA sequence after the sample DNA has been digested, separated, and immobilized [9] [25]. The process begins with the digestion of high-molecular-weight genomic DNA using restriction enzymes, which cleave the DNA at specific recognition sites [25]. The resulting fragments are then separated by size using agarose gel electrophoresis [25]. The separated DNA fragments are denatured into single strands and transferred from the gel onto a solid nylon or nitrocellulose membrane, a process known as blotting [9]. The final and most specific step is hybridization, where a labeled probe binds to its exact complementary sequence on the membrane. After washing to remove non-specifically bound probe, the pattern of hybridization is visualized, providing information on the identity, size, and abundance of the target DNA sequence [9] [25].
Key Applications in Biopharmaceutical Development
- Cell Bank Characterization: Regulatory guidelines (e.g., ICH Q5A, Q5B) require Southern blot analysis to confirm the genomic stability of Master Cell Banks (MCB) and Working Cell Banks (WCB) used in the production of biologics [62]. The technique verifies that the structure of the inserted gene remains unchanged and that no clonal rearrangements have occurred during the cell bank expansion process [62] [63]. This is critical for ensuring the consistent quality and safety of therapeutic proteins.
- Gene Therapy and Vector Analysis: In gene therapy, Southern blot is employed for integration site analysis to determine the copy number and structure of the therapeutic gene inserted into the patient's cells or the viral vector [49]. It is also used to confirm successful gene knock-in or knock-out in animal models and to check for the absence of replication-competent viruses [49].
- Structural Variant Analysis: Southern blotting is highly effective for detecting gene rearrangements, amplifications, and large deletions, such as those found in cancer genomes [41]. For example, it has been historically crucial for identifying immunoglobulin gene rearrangements in lymphomas and leukemias, and for analyzing complex loci like those involved in Fragile X syndrome (FMR1 gene) [64] [41].
The following workflow diagram illustrates the key procedural steps in Southern blot analysis:
Experimental Protocols
Comprehensive Southern Blot Protocol
Step 1: DNA Digestion
- Isolate high-quality genomic DNA from biological samples (e.g., cell banks) using a standard phenol-chloroform extraction method or a commercial kit, ensuring an absorption ratio (A260/A280) between 1.6 and 2.0 [64] [25].
- Digest 5-10 µg of the extracted DNA with an appropriate restriction enzyme (e.g., EcoRI, HindIII).\ Use 20-50 units of enzyme per µg of DNA in the recommended buffer. Incubate at 37°C for a minimum of 6 hours, or overnight, to ensure complete digestion [25].
Step 2: Gel Electrophoresis
- Load the digested DNA fragments onto a 0.8-1.0% agarose gel. Include a DNA molecular weight ladder (e.g., 1 kb Plus DNA Ladder) in a separate lane for accurate size determination [25].
- Perform electrophoresis at 70-100 volts until adequate separation of fragments is achieved, typically when the dye front has migrated 75-80% of the gel length [25].
Step 3: Blotting
- Denature the DNA within the gel by soaking it in a denaturing solution (0.5M NaOH, 1.5M NaCl) for 30-45 minutes with gentle agitation [9] [41].
- Transfer the denatured DNA fragments from the gel to a positively charged nylon membrane (e.g., BrightStar-Plus Membranes) via capillary action or vacuum transfer [25]. Capillary transfer with 20X SSC buffer typically proceeds overnight.
- Immobilize the DNA on the membrane by UV cross-linking or baking at 80°C for 2 hours [9].
Step 4: Probe Preparation and Hybridization
- Prepare a probe specific to your target DNA sequence. Label the probe with a radioactive isotope (e.g., ³²P) or a non-radioactive tag (e.g., biotin, digoxigenin) using random primer labeling or PCR-based methods [25].
- Pre-hybridize the membrane for 30-60 minutes at the appropriate hybridization temperature (typically 42-65°C) using a commercial hybridization buffer (e.g., ULTRAhyb Ultrasensitive Hybridization Buffer) to block non-specific binding sites [25].
- Denature the labeled probe and add it to the fresh hybridization buffer. Incubate the membrane with the probe solution for at least 2 hours, or overnight, with constant agitation [25].
Step 5: Washing and Detection
- Wash the membrane to remove unbound probe. Start with low-stringency washes (e.g., 2X SSC, 0.1% SDS at room temperature) followed by high-stringency washes (e.g., 0.1X SSC, 0.1% SDS at 65°C) [25].
- Detect the hybridized probe using a method appropriate for the label. For chemiluminescent detection, incubate the membrane with the appropriate substrate (e.g., CDP-Star for alkaline phosphatase-conjugated probes) and expose to X-ray film or capture the image using a digital imager [25].
Protocol for Cell Line Stability Testing
For cell bank characterization, the general protocol is applied with specific modifications to meet regulatory standards:
- Sample Triangulation: Test the Master Cell Bank (MCB), Working Cell Bank (WCB), and End of Production Cells (EOPC) in parallel to allow direct comparison [62].
- Control Strategy: Include a reference sample of known structure (e.g., the original plasmid construct) as a positive control, and untransfected host cell DNA as a negative control [62].
- Multi-Enzyme Digestion: Digest DNA with at least two different restriction enzymes that flank the integration site. This confirms the identity of the integrated gene and can provide information about copy number [62].
- Probe Design: Use a probe specific to the transgenic sequence. The results are analyzed by comparing the banding patterns of the test samples to the controls and the molecular weight marker. The presence of a single band of the expected size confirms a single-copy, stable integration, while multiple or unexpected bands may indicate rearrangements or multiple integrations [62].
Data Presentation and Analysis
Quantitative Performance Data
The following table summarizes key performance metrics and requirements for Southern blot analysis in a regulated environment, illustrating its demands and capabilities:
Table 1: Southern Blot Performance and Resource Requirements
| Parameter | Typical Requirement / Performance | Comparison to PCR [41] | Application Context |
|---|---|---|---|
| DNA Input | 5-10 µg [41] | < 1 µg | High-quality genomic DNA from cell banks [62]. |
| Target Size Range | Up to 20 kb [41] | < 5 kb | Suitable for analyzing large genetic loci and integrations. |
| Sensitivity | ~0.1 pg of target DNA [41] | Can detect a single molecule | Sufficient for characterizing dominant clones in a bank. |
| Turnaround Time | 2-3 days [41] | Several hours | Required for thorough digestion, transfer, and hybridization. |
| Key Data Output | Restriction fragment size & abundance [25] | Presence/absence of a short sequence | Provides direct evidence of structural integrity [62]. |
Regulatory Analysis for Cell Bank Characterization
The value of Southern blotting is demonstrated by its specific applications in a GxP environment, as detailed below:
Table 2: Southern Blot Applications in Biologics Development
| Testing Objective | Experimental Approach | Acceptance Criteria / Data Interpretation |
|---|---|---|
| Genetic Stability | Compare restriction patterns of MCB, WCB, and EOPC using multiple enzymes and probes [62]. | Banding patterns must be identical across all cell banks, demonstrating no structural changes [62]. |
| Copy Number Analysis | Hybridize with a transgene-specific probe; compare band intensity to a single-copy control. | Estimate copy number based on the intensity and number of hybridizing bands. |
| Integration Site Analysis | Digest DNA with an enzyme that does not cut within the transgene, producing a large fragment. | A single hybridizing band indicates a single integration site; multiple bands suggest multiple sites [49]. |
| Identity Confirmation | Digest DNA with enzymes that cut within the vector to release an internal fragment. | A band of the predicted size confirms the correct identity of the integrated construct [62]. |
The following diagram illustrates the logic and decision-making process for analyzing Southern blot data in cell line stability testing:
The Scientist's Toolkit: Research Reagent Solutions
Successful Southern blot analysis relies on a suite of specialized reagents and equipment. The following table catalogues essential materials and their functions.
Table 3: Essential Reagents and Equipment for Southern Blotting
| Item | Function / Application | Example Products / Notes |
|---|---|---|
| Restriction Enzymes | Sequence-specific digestion of genomic DNA to generate defined fragments. | High-quality enzymes from suppliers like Thermo Fisher Scientific, used with optimized buffers [25]. |
| Positively Charged Nylon Membrane | Solid support for immobilizing denatured DNA fragments after electrophoresis. | Invitrogen BrightStar-Plus Membranes; offer high binding capacity and durability [25]. |
| Labeled Nucleic Acid Probes | Sequence-specific detection of target DNA fragments after hybridization. | Can be radiolabeled (³²P) or non-isotopic (biotin, digoxigenin). Critical for sensitivity and specificity [25]. |
| Hybridization Buffer | Creates an optimal chemical environment for specific probe-target binding while minimizing background. | Invitrogen ULTRAhyb Buffer can increase sensitivity and reduce hybridization time to 2 hours [25]. |
| Chemiluminescent Detection Kit | Visualizes the hybridized probe on the membrane for data capture and analysis. | BrightStar BioDetect Kit; includes substrates for non-isotopic detection, optimized for use with specific membranes [25]. |
Southern blotting remains a powerful and uniquely definitive tool for the direct assessment of DNA structure. Its requirement for large DNA inputs and lengthy procedures is counterbalanced by the robust, quantitative, and hypothesis-free data it provides regarding the structure and integrity of genetic material [41]. In the context of cell bank characterization and gene therapy development, where product consistency and patient safety are paramount, it continues to be a cornerstone of regulatory compliance [62]. While newer technologies like NGS and digital PCR offer higher throughput for specific questions, the visual confirmation of a restriction fragment of the expected size provides a level of confidence that solidifies Southern blotting's status as a gold standard for validation in these critical fields.
Within molecular biology, the accurate detection and analysis of specific DNA sequences is a cornerstone of research and diagnostics. Southern blotting, a technique pioneered by Edwin Southern in 1975, was the original gold standard for this purpose, enabling researchers to identify specific DNA sequences within complex genomes [9]. Despite the subsequent development of powerful amplification-based techniques like Polymerase Chain Reaction (PCR) and sequencing technologies, Southern blotting maintains a defined niche in the modern scientific toolkit. This application note provides a contemporary comparative analysis of Southern blotting against PCR and DNA sequencing technologies. Framed within broader research on DNA sequence detection, this document details the specific strengths and limitations of each method, providing detailed protocols and data to guide researchers and drug development professionals in selecting the optimal technique for their experimental objectives.
Principles and Workflows
Southern Blotting: Core Principle and Detailed Protocol
The fundamental principle of Southern blotting involves the transfer of electrophoresis-separated DNA fragments from a gel to a solid membrane, followed by hybridization with a labeled, sequence-specific probe for detection [9]. Its workflow is multi-step and requires careful execution.
Detailed Experimental Protocol:
- DNA Isolation: Extract high-molecular-weight DNA from biological samples (e.g., blood, tissue). The method requires a relatively large amount of DNA (5-10 μg) [41].
- Restriction Digestion: Digest the purified DNA using one or more restriction endonucleases (e.g., BamHI, KpnI) to generate smaller fragments. Incubate at 37°C for a minimum of 2 hours, or overnight for complex genomes [9] [65].
- Gel Electrophoresis: Load the digested DNA onto an agarose gel (typically 0.5%-2%) submerged in TAE or TBE buffer. Include a DNA molecular weight marker. Apply an electric current (e.g., 100 mV) to separate fragments by size [56] [65].
- Denaturation and Transfer:
- Denaturation: Soak the gel in an alkaline solution (e.g., 0.5M NaOH) to denature double-stranded DNA into single strands [9].
- Blotting: Assemble a transfer stack to facilitate the capillary movement of DNA from the gel onto a nylon or nitrocellulose membrane. Nylon membranes are preferred for their superior durability and DNA binding capacity [9] [65].
- Immobilization: Fix the DNA to the membrane by baking at 80°C for 2 hours or by exposing it to ultraviolet radiation (for nylon membranes) [9].
- Hybridization: Incubate the membrane with a pre-hybridization solution containing blocking DNA (e.g., salmon sperm DNA) to reduce non-specific binding. Replace with a hybridization solution containing a labeled (radioactive, fluorescent, or chemiluminescent) DNA or RNA probe complementary to the target sequence. Incubate for several hours to overnight [56] [65].
- Washing and Detection:
- Washing: Perform a series of low-stringency and high-stringency washes with buffers (e.g., SSC with SDS) to remove unbound and partially bound probe [56].
- Detection: Visualize the hybridized probe. For chemiluminescent labels, add a substrate and capture the signal on X-ray film or with a digital imager [56].
The following workflow diagram illustrates the key steps in the Southern blotting process:
PCR and DNA Sequencing: Core Principles
Polymerase Chain Reaction (PCR) is an in vitro technique that exponentially amplifies a specific DNA segment using two oligonucleotide primers and a DNA polymerase. Quantitative PCR (qPCR) and digital PCR (dPCR) are advanced variants that enable quantification. qPCR monitors amplification in real-time using fluorescent reporters, while dPCR partitions a sample into thousands of nanoreactions for absolute quantification without a standard curve [7].
DNA Sequencing determines the precise nucleotide order of a DNA fragment. Next-Generation Sequencing (NGS), or Massively Parallel Sequencing, represents the modern standard, allowing for the simultaneous sequencing of millions of fragments [66]. This provides comprehensive data far beyond single-gene analysis, enabling whole-genome sequencing, transcriptome analysis, and metagenomic studies.
Comparative Performance Analysis
The selection of a DNA analysis method involves balancing factors such as sensitivity, throughput, cost, and information required. The following tables provide a structured comparison of these key parameters.
Table 1: Comparison of Key Performance and Practical Metrics
| Metric | Southern Blotting | qPCR | dPCR | NGS (Short-Read) |
|---|---|---|---|---|
| Target Molecule | DNA | DNA | DNA | DNA/RNA |
| Detection Principle | Hybridization | Amplification & Fluorescence | Partitioning & Amplification | Sequencing by Synthesis |
| Sensitivity | Low (requires μg of DNA) [41] | High (pg-ng of DNA) | Very High; tolerant of inhibitors [7] | Very High (low input possible) |
| Quantification | Semi-quantitative | Relative or Absolute (with std. curve) | Absolute (without std. curve) [7] | Quantitative (read count based) |
| Throughput | Low (not scalable) [3] | Medium to High | Medium | Very High |
| Multiplexing | Limited (usually single-plex) | Limited | Limited | High (thousands of targets) |
| Turnaround Time | Slow (3+ days) [7] | Fast (< 1 day) [7] | Fast (< 1 day) [7] | Slow (days, incl. analysis) |
| Technical Expertise | High (manual technique) [7] | Medium | Medium | High (bioinformatics essential) [7] |
Table 2: Systematic Comparison of Strengths and Limitations for Gene Copy Number Variation (CNV) Analysis [7]
| Method | Key Strengths | Key Limitations |
|---|---|---|
| Southern Blotting | Can scan large genomic regions (1000s of bp); Useful for complex rearrangements and repetitive sequences [41]. | Low sensitivity; Labor-intensive; Poor quantification for multi-copy genes; Requires large amount of high-quality DNA [7]. |
| qPCR | Higher throughput and sensitivity than SB; Cost-effective; Standard molecular lab skills required. | Relies on precise calibration; Resolution limits for high-copy genes; Struggles with complex rearrangements [7]. |
| dPCR | Absolute quantification without standard curve; High accuracy for multi-copy genes; Tolerant of inhibitors and degraded DNA [7]. | Lower throughput than qPCR; Higher cost per sample than qPCR; Not ideal for scanning unknown large regions [7]. |
| NGS (PE-WGS) | Unbiased, genome-wide view; Can identify structural variants, flanking sequences, and integration sites; Precise for multi-copy genes [7]. | Highest cost; Complex data analysis; Requires significant DNA and bioinformatics expertise [7]. |
Recent systematic benchmarking on genetically modified (GM) crops illustrates these performance differences in practice. For example, in quantifying single-copy transgenes, all four methods (SB, qPCR, dPCR, and paired-end whole-genome sequencing, PE-WGS) produced concordant results. However, discrepancies emerged with multi-copy genes, where Southern blotting often underestimated copy numbers due to complex arrangements, while dPCR and PE-WGS provided precise quantification [7].
Essential Research Reagents and Materials
The successful execution of a Southern blot requires a specific set of reagents and materials. The following table details key components and their functions.
Table 3: Key Research Reagent Solutions for Southern Blotting
| Reagent/Material | Function/Description | Example Application Notes |
|---|---|---|
| Restriction Endonucleases | Enzymes that cut DNA at specific recognition sequences. | Used to digest genomic DNA into fragments of manageable size for electrophoresis (e.g., BamHI, SacI) [7]. |
| Agarose | A polysaccharide polymer used to form a sieve-like gel for DNA separation. | Standard gel matrix for separating DNA fragments from 100 bp to several kilobases [65]. |
| Nylon Membrane | A solid support membrane with high nucleic acid binding affinity. | Preferred over nitrocellulose for its durability and superior binding capacity, enabling covalent cross-linking of DNA [9] [65]. |
| Labeled DNA Probe | A complementary nucleic acid sequence tagged for detection. | Hybridizes to the target DNA sequence on the membrane. Labels can be radioactive (e.g., ³²P), fluorescent, or enzymatic (e.g., DIG) [3] [65]. |
| Hybridization Buffer | A solution containing salts, buffers, and blocking agents. | Creates optimal conditions for probe binding while minimizing non-specific hybridization through the use of blocking agents like salmon sperm DNA [65]. |
Southern blotting, PCR, and DNA sequencing are not mutually exclusive technologies but represent a continuum of tools for DNA analysis, each with its own domain of application. Southern blotting remains a powerful, albeit niche, technique for applications requiring the analysis of complex DNA rearrangements, repetitive sequences, and long-range structural variations where amplification-based methods may fail. However, for the majority of applications requiring high sensitivity, rapid turnaround, quantification, or comprehensive genomic analysis, PCR and NGS methods are unequivocally superior. The choice of technique must be driven by the specific research question, weighing the need for targeted analysis against whole-genome exploration, the required level of quantification, and practical constraints of cost, time, and expertise. As sequencing costs continue to decline and technologies evolve, the scope of NGS applications will expand further, yet the foundational principles and specific utilities of Southern and blotting techniques will remain a critical part of molecular biology history and practice.
The Uniqueness of Southern Blot for Analyzing Large Deletions and Complex Rearrangements
Within the landscape of molecular biology techniques, Southern blotting maintains a unique and irreplaceable role in the study of genomic integrity, particularly for the detection of large deletions and complex rearrangements. While newer nucleic acid detection technologies have emerged, the Southern blot's capacity to analyze intact DNA fragments provides specific advantages for characterizing major genomic alterations. This is critically important in research areas such as DNA repair dynamics, where, for instance, the CST complex in interaction with Polα-primase has been shown to promote local deletions of 5–85 bp during a backup non-homologous end joining (NHEJ) repair pathway, guarding against even larger, more deleterious deletions [67]. This application note details the specific protocols and applications that leverage the unique capabilities of Southern blotting for these complex analyses.
The Unique Advantages for Analyzing Structural Variations
Southern blotting offers a set of characteristics that make it particularly suited for the analysis of large-scale genomic changes, which can be challenging to detect with short-read sequencing or PCR-based methods.
Key Advantages include:
- Intact DNA Fragment Analysis: Unlike PCR, Southern blot does not require primer binding to flanking sequences that might be deleted or altered. It can detect rearrangements regardless of their location within a large DNA fragment, provided they alter the restriction pattern.
- Size Determination of Large Alterations: It accurately sizes deletions, duplications, and insertions that are too large for standard PCR amplification, providing direct physical evidence of the genomic alteration.
- Detection of Complex Rearrangements: Southern blotting can reveal complex patterns, such as those arising from gene rearrangements, expansion of repetitive sequences, or the integration of viral DNA, by analyzing changes in restriction fragment lengths and hybridisation patterns.
- Insight into DNA Repair Mechanisms: As highlighted in recent research, Southern blot analysis is pivotal in elucidating DNA repair pathways. For example, it has been used to characterize the signature of the CST complex, which mediates post-resection NHEJ leading to specific, intermediate-size deletions, thereby preventing even larger, more harmful genomic rearrangements [67].
Table 1: Southern Blotting Versus Alternative Techniques for Detecting Genomic Rearrangements
| Feature | Southern Blotting | Long-Range PCR | Next-Generation Sequencing (Short-Read) |
|---|---|---|---|
| Optimal Deletion Size Range | 10 bp to several kb | Up to ~20-30 kb | 1 bp to ~50 bp (indels); larger require special analysis |
| Requirement for Flanking Sequence | No | Yes | Yes |
| Ability to Detect Complex Rearrangements | High | Moderate | Low without specialized libraries |
| Quantification of Heterogeneity | Semi-quantitative | Qualitative | High (variant allele frequency) |
| Throughput | Low | Medium | High |
| Handling of Repetitive Regions | Good (with probe design) | Poor | Poor |
Detailed Protocol for Detecting Large Deletions
This protocol is designed for the detection of a large genomic deletion in a mouse model, but the principles are universally applicable.
Reagent Solutions and Essential Materials
Table 2: Research Reagent Solutions for Southern Blotting
| Item | Function | Specific Example / Notes |
|---|---|---|
| Restriction Endonucleases | Digest genomic DNA into defined fragments. | Use enzymes that flank the region of interest (e.g., EcoRI, HindIII). A combination may be needed. |
| Agarose Gel | Separates DNA fragments by size. | Use high-quality agarose (0.7-1.0%) for optimal resolution of large fragments. |
| Nylon Membrane | Immobilizes denatured DNA fragments for hybridization. | Positively charged nylon membrane is standard. |
| Labeled DNA Probe | Hybridizes to the target sequence for detection. | A ~500-1000 bp fragment complementary to a region within the expected restriction fragment. Label with DIG or ³²P. |
| Hybridization Buffer | Provides environment for specific probe binding. | Contains salts, Denhardt's solution, SDS, and carrier DNA to reduce background. |
| Stringency Washes | Removes non-specifically bound probe. | SSC solutions of varying concentrations (e.g., 2X SSC to 0.1X SSC) and temperatures. |
| Detection System | Visualizes the bound probe. | Chemiluminescent substrates (for DIG) or X-ray film (for ³²P). |
Workflow for Detection of Large Deletions
The following diagram outlines the core experimental workflow.
Step-by-Step Methodology
Genomic DNA Isolation & Quantification:
- Isolate high-molecular-weight DNA from tissue or cells using a standard phenol-chloroform protocol or a commercial kit designed for Southern blotting. Avoid vortexing to prevent shearing.
- Precisely quantify the DNA using a fluorometer. You will need 5-10 µg of DNA per restriction digest.
Restriction Enzyme Digestion:
- Set up digestion reactions with a 2-4 fold excess of restriction enzyme (e.g., 20-40 units per µg DNA) to ensure complete digestion.
- Incubate for a minimum of 6 hours or overnight at the enzyme's optimal temperature.
- Include a control DNA sample with a known, unaffected genotype.
Agarose Gel Electrophoresis:
- Cast a 0.7% or 0.8% agarose gel in 1X TAE buffer. Use a wide-tooth comb for loading.
- Mix digested DNA with loading dye and load onto the gel alongside a high-molecular-weight DNA ladder (e.g., Lambda HindIII ladder).
- Run the gel slowly at 1-2 V/cm until adequate separation is achieved. This may take 16-24 hours.
DNA Denaturation, Neutralization, and Transfer:
- Depurinate the DNA by soaking the gel in 0.25 M HCl for 15 minutes with gentle agitation.
- Denature the DNA by soaking in a denaturing solution (1.5 M NaCl, 0.5 M NaOH) for 30 minutes.
- Neutralize the gel by soaking in a neutralizing solution (1.5 M NaCl, 0.5 M Tris-HCl, pH 7.4) for 30 minutes.
- Transfer the DNA to a positively charged nylon membrane via capillary transfer overnight using 20X SSC as the transfer buffer.
UV Crosslinking and Pre-hybridization:
- Crosslink the DNA to the membrane using a UV crosslinker according to the manufacturer's instructions.
- Pre-hybridize the membrane in a buffer containing 6X SSC, 5X Denhardt's solution, 0.5% SDS, and 100 µg/mL denatured salmon sperm DNA for 1-2 hours at the hybridization temperature.
Probe Labeling and Hybridization:
- Label your specific DNA probe (200-1000 bp) with a Digoxigenin (DIG) or ³²P labeling kit.
- Denature the labeled probe and add it to fresh pre-hybridization buffer. Incubate the membrane with the probe solution overnight at the appropriate temperature (typically 65-68°C for high stringency).
Stringency Washes and Detection:
- Perform a series of post-hybridization washes:
- Two washes with 2X SSC, 0.1% SDS for 5 minutes at room temperature.
- Two washes with 0.5X SSC, 0.1% SDS for 15 minutes at 65-68°C (adjust temperature/stringency based on probe).
- For DIG-labeled probes, proceed with blocking, antibody incubation, and chemiluminescent detection as per the manufacturer's protocol. Expose to X-ray film or a digital imager.
- Perform a series of post-hybridization washes:
Data Interpretation and Analysis
The power of Southern blotting lies in the interpretation of the banding pattern. A large deletion will result in a smaller restriction fragment compared to the wild-type allele.
Expected Results:
- Wild-Type Sample: A single band (for a homozygous sample) corresponding to the expected full-length restriction fragment.
- Heterozygous Deletion: Two bands - one corresponding to the wild-type fragment and a smaller, faster-migrating band corresponding to the deleted allele.
- Homozygous Deletion: A single band that is smaller than the wild-type fragment.
Table 3: Quantitative Data Analysis from a Simulated Deletion Experiment
| Sample Genotype | Expected Fragment Size (Wild-Type Probe) | Observed Band Size | Interpretation |
|---|---|---|---|
| Wild-Type | 10,000 bp | ~10,000 bp | Normal allele present |
| Heterozygous for 2 kb deletion | 10,000 bp | ~10,000 bp and ~8,000 bp | One normal and one deleted allele |
| Homozygous for 2 kb deletion | 10,000 bp | ~8,000 bp | Only the deleted allele is present |
The following diagram illustrates the logical relationship between the genomic alteration and the observed result on the Southern blot.
Troubleshooting Common Issues
- High Background: Ensure the membrane is not allowed to dry out during hybridization or washing. Increase the concentration of blocking agent and carrier DNA in the pre-hybridization/hybridization buffers. Increase stringency of washes.
- No Signal: Verify probe labeling efficiency. Check the integrity of the genomic DNA and the efficiency of the restriction digest. Ensure the probe sequence is correct and specific to the target.
- Faint or Weak Bands: Increase the amount of DNA loaded. Increase the exposure time for detection. Check the probe specific activity and the transfer efficiency.
Southern blotting remains a powerful and definitive tool for analyzing large genomic deletions and complex rearrangements. Its unique ability to provide a direct physical map of DNA structure, independent of flanking sequences, makes it invaluable for validating findings from next-generation sequencing and for investigating complex DNA repair mechanisms, as demonstrated in studies of the CST complex and NHEJ [67]. While the market for Southern blot instruments continues to evolve, with a projected growth fueled by demands in genetic analysis and a trend towards automation [68], the fundamental principles and applications of the technique ensure its continued relevance in the molecular biologist's toolkit.
Within the current molecular diagnostics landscape, advanced PCR techniques and next-generation sequencing often dominate discussions. However, for specific genetic disorders characterized by complex mutations, the Southern blot method remains an indispensable tool in clinical and research settings. This technique, developed by Edwin Southern in 1975, provides critical information that newer methods cannot always reliably deliver [9]. Southern blotting combines restriction enzyme digestion, gel electrophoresis, and fragment detection using labeled probes to analyze specific DNA sequences within complex genomes [51]. Its enduring value lies in its ability to directly assess large genomic rearrangements and epigenetic modifications without amplification bias, making it particularly suitable for diagnosing conditions involving tandem repeat expansions and mitochondrial DNA abnormalities.
This article details the specific clinical applications and methodologies of Southern blotting for two distinct disorder classes: Fragile X syndrome (FXS), the most common inherited form of intellectual disability, and mitochondrial DNA (mtDNA) depletion syndromes, a group of severe metabolic disorders. We provide detailed protocols, data interpretation guidelines, and resource information to support researchers and clinical laboratory professionals in maintaining robust diagnostic capabilities for these conditions.
Southern Blotting in Fragile X Syndrome Diagnosis
Clinical Rationale and Genetic Basis
Fragile X syndrome is caused by an expansion of a CGG trinucleotide repeat in the 5' untranslated region of the FMR1 gene located on the X chromosome [69] [70]. The molecular diagnosis hinges on precisely determining both the size of the repeat expansion and its methylation status, as these two factors directly correlate with disease expression [70]. Normal alleles contain approximately 5-44 CGG repeats, premutation alleles contain 55-200 repeats, and full mutation alleles exceed 200 repeats [71]. The full mutation is typically associated with methylation-mediated transcriptional silencing of the FMR1 gene, leading to loss of the FMRP protein and clinical manifestations of the syndrome [69].
While PCR-based methods effectively amplify normal and premutation-sized alleles, they often fail to amplify larger full mutations due to the extensive CGG repeats and high GC content [72] [71]. Southern blot analysis overcomes this limitation, enabling detection of all allele sizes while simultaneously providing essential information about the methylation status of the FMR1 promoter region [72] [70]. A 2012 comparative study confirmed that while PCR-based screening could identify expanded alleles, Southern blotting remained superior for accurately differentiating premutation from full mutation alleles, with the latter showing characteristic smearing on Southern blot analysis due to somatic mosaicism [71].
Detailed Laboratory Protocol for FXS Diagnosis
The following protocol for FXS diagnosis utilizes a non-radioactive chemiluminescent detection system, offering a convenient and rapid alternative to traditional radioactive methods while maintaining high sensitivity and specificity [72] [69].
DNA Digestion and Fragmentation
- DNA Isolation and Quantification: Extract high-molecular-weight genomic DNA (≥10 μg) from patient lymphocytes or other tissues using standard phenol-chloroform methods or commercial kits. Precisely quantify DNA using fluorometry to ensure accurate restriction enzyme digestion [72] [51].
- Restriction Enzyme Digestion: Digest the genomic DNA overnight at 37°C with a combination of EcoRI and the methylation-sensitive enzyme EagI [72] [69]. EcoRI cuts flanking the CGG repeat region, while EagI cuts within the FMR1 CpG island promoter and is sensitive to its methylation status. This dual digestion strategy allows for simultaneous determination of repeat expansion size and methylation status, as methylated alleles (characteristic of full mutations) are resistant to EagI cleavage [69].
Gel Electrophoresis and Blotting
- Agarose Gel Electrophoresis: Size-fractionate the digested DNA fragments on a 1% agarose gel.- The gel includes molecular weight standards for accurate fragment sizing. Electrophoresis typically runs overnight to achieve optimal separation of fragments ranging from normal alleles (~2.8 kb) to large full mutations (>5 kb) [72].
- DNA Denaturation and Transfer: Following electrophoresis, denature the DNA in the gel using an alkaline solution (e.g., 0.5 M NaOH) to produce single-stranded DNA suitable for hybridization. Transfer the DNA fragments from the gel to a positively charged nylon membrane via capillary or vacuum blotting [9] [51]. Immobilize the DNA on the membrane by UV crosslinking or baking at 80°C [51].
Probe Hybridization and Detection
- Probe Labeling: Label the StB12.3 probe (a recombinant plasmid containing sequences flanking the CGG repeat region) with digoxigenin-11-dUTP (DIG) via PCR amplification using M13 primers [72] [69].
- Membrane Hybridization: Pre-hybridize the membrane to reduce nonspecific binding, then hybridize with the DIG-labeled StB12.3 probe under stringent conditions [72].
- Chemiluminescent Detection: Incubate the membrane with an alkaline phosphatase-conjugated anti-DIG antibody. Detect the hybridized fragments by adding the chemiluminescent substrate CDP-Star, which produces light upon dephosphorylation. Expose the membrane to X-ray film to capture the hybridization signal pattern [72] [69].
The following workflow diagram illustrates the key steps in this diagnostic process:
Data Interpretation and Quality Control
Interpretation of Southern blot results for FXS requires analysis of both fragment sizes and methylation patterns:
- Normal Alleles: Typically appear as a single ~2.8 kb band with EcoRI digestion and an additional ~2.4 kb band with EagI digestion, indicating an unmethylated (active) promoter [69].
- Full Mutation Alleles: Appear as a diffuse smear at higher molecular weights (>5 kb) with EcoRI alone. The absence of EagI digestion products at ~2.4 kb indicates a methylated (silenced) promoter [69].
- Mosaicism: May show a combination of discrete premutation-sized bands and a full mutation smear, representing a mixture of cells with different expansion sizes [69].
For quality control, each blot should include DNA from unaffected controls and previously characterized positive controls for premutation and full mutation alleles. The molecular weight standards enable accurate size determination of unknown fragments [72].
Southern Blotting in mtDNA Depletion Syndromes
Clinical Rationale and Genetic Basis
Mitochondrial DNA depletion syndromes (MDS) are a genetically heterogeneous group of autosomal recessive disorders characterized by a severe reduction in mtDNA copy number in specific tissues, without an increase in mutant mtDNA molecules [73]. These conditions result from defects in nuclear genes involved in mtDNA replication and nucleotide metabolism, leading to impaired energy production in affected tissues and often presenting in infancy or childhood with progressive liver failure, myopathy, or encephalopathy [73].
Southern blot analysis serves a dual role in diagnosing mitochondrial disorders: it detects large-scale mtDNA deletions and, when combined with accurate quantification, can reveal mtDNA depletion [73]. While real-time quantitative PCR (qPCR) has emerged as a sensitive method for detecting mtDNA depletion and low-percentage mutations, Southern blotting remains valuable for confirming large rearrangements and providing orthogonal validation of qPCR findings [73].
Laboratory Protocol for mtDNA Analysis
DNA Digestion and Southern Blot Analysis
- Restriction Enzyme Selection: Digest total DNA (2-5 μg) isolated from muscle, liver, or other affected tissues with restriction enzymes that produce distinctive mtDNA fragment patterns. Commonly used enzymes include BamHI, PvuII, or EcoRI, which cut mammalian mtDNA at a limited number of sites to produce characteristic fragments [73].
- Hybridization with mtDNA-Specific Probes: Following electrophoresis and blotting, hybridize membranes with radiolabeled or chemiluminescent probes specific to the mitochondrial genome. Probes may consist of a mixture of PCR fragments covering the entire mitochondrial genome or specific regions frequently involved in deletions [73].
- Quantification and Normalization: To assess mtDNA depletion, compare the intensity of mtDNA fragments to that of a single-copy nuclear gene (e.g., 18S rRNA) on the same blot. Densitometric analysis allows estimation of mtDNA copy number relative to nuclear DNA [73].
Complementary qPCR Method
While not a Southern blot protocol, real-time qPCR has become an important complementary technique for comprehensive mtDNA analysis. This method uses TaqMan probes specific for various mtDNA regions (e.g., tRNA leuUUR, ND4, ATPase8, D-loop) and nuclear genes (e.g., β-actin, β-2-microglobulin) to simultaneously detect deletions and quantify total mtDNA content [73]. This approach is particularly useful for identifying multiple mtDNA deletions that may be present at low percentages undetectable by Southern blot analysis [73].
The following workflow illustrates the integrated approach for analyzing mitochondrial DNA disorders:
Comparative Data Analysis
Performance Characteristics of Southern Blotting
Table 1: Comparative Performance of Southern Blotting in Genetic Diagnostics
| Parameter | Fragile X Syndrome | mtDNA Depletion/Deletions |
|---|---|---|
| Primary Diagnostic Target | CGG repeat expansion size & methylation status in FMR1 gene [72] [70] | Large-scale mtDNA rearrangements & copy number reduction [73] |
| Sample Requirement | 10-20 μg genomic DNA [51] | 2-5 μg total DNA [73] |
| Key Restriction Enzymes | EcoRI, EagI (methylation-sensitive) [72] [69] | BamHI, PvuII, EcoRI [73] |
| Detection Method | Chemiluminescent with DIG-labeled probes [72] [69] | Radioactive or chemiluminescent with mtDNA probes [73] |
| Time to Result | 3-5 days [51] | 3-5 days |
| Advantages | Detects all mutation sizes; provides methylation status; gold standard [72] [71] [70] | Detects large rearrangements; quantitative; no amplification bias [73] |
| Limitations | Labor-intensive; requires large DNA amounts; low throughput [51] [3] | Less sensitive for low-level mutations; requires tissue-specific analysis [73] |
Recent Advances and Emerging Techniques
Recent developments continue to enhance the utility of Southern blotting in molecular diagnostics:
- Non-Radioactive Detection: Chemiluminescent methods using digoxigenin-labeled probes now provide sensitivity comparable to radioactive detection without associated handling and disposal concerns [72] [69].
- Integrated Testing Approaches: For FXS diagnosis, many laboratories now employ a two-tiered testing algorithm with initial PCR screening followed by Southern blot confirmation for expanded alleles, optimizing both efficiency and accuracy [71] [70].
- Therapeutic Applications: Recent research has identified small-molecule activators of mtDNA synthesis (e.g., PZL-A compounds) that can restore function to mutant mitochondrial DNA polymerases, offering potential treatments for POLG-related disorders [74]. Southern blotting and related techniques play crucial roles in validating the effects of such therapeutic compounds on mtDNA integrity and copy number.
Table 2: Key Research Reagents for Southern Blot-Based Diagnostics
| Reagent/Category | Specific Examples | Research Application |
|---|---|---|
| Restriction Enzymes | EcoRI, EagI, BamHI, PvuII [72] [73] | Target-specific DNA fragmentation; methylation analysis |
| Membranes | Positively charged nylon, nitrocellulose [9] [51] | Nucleic acid immobilization for hybridization |
| Labeling Systems | Digoxigenin (DIG)-dUTP, chemiluminescent substrates (CDP-Star) [72] [69] | Non-radioactive probe labeling and detection |
| Hybridization Probes | StB12.3 for FMR1, mtDNA-specific probes [72] [73] | Target sequence recognition and binding |
| Detection Reagents | Alkaline phosphatase-conjugated antibodies, X-ray film [72] [51] | Visualization of hybridized fragments |
| Reference Standards | Molecular weight ladders, positive control DNA [72] [73] | Fragment sizing and quality assurance |
Southern blot analysis maintains a critical position in the molecular diagnostics arsenal for specific genetic disorders despite the emergence of newer technologies. For Fragile X syndrome, it remains the gold-standard method for comprehensive evaluation of CGG repeat expansion size and methylation status, providing essential diagnostic and prognostic information [72] [71] [70]. In mitochondrial disorders, it offers unparalleled capability for detecting large-scale rearrangements and validating quantitative findings from other methods [73].
The enduring value of Southern blotting lies in its direct biochemical approach to analyzing DNA structure and quantity without amplification bias, providing a level of validation that PCR-based methods cannot always achieve. Furthermore, its capacity to assess epigenetic modifications through methylation-sensitive restriction enzymes adds a dimension of analysis that remains challenging for many alternative techniques [3]. As therapeutic development advances for these disorders, particularly in the mitochondrial disease领域 where small-molecule activators show promise [74], Southern blotting will continue to provide critical analytical capabilities for both diagnostic and research applications.
Conclusion
Southern blotting remains an indispensable, gold-standard technique in molecular biology, particularly for applications requiring the analysis of large DNA fragments, gene rearrangements, and complex genetic alterations. While newer methods like PCR and NGS offer advantages in speed and sensitivity for specific tasks, Southern blotting provides a unique and robust approach for validating transgene integration, characterizing cell banks, and diagnosing specific genetic disorders. Its future lies in integration with modern technologies, such as automated probe design and non-radioactive detection, ensuring its continued value in quality control, clinical diagnostics, and advanced genetic research for years to come.
References
- 1. 南方墨點法- 維基百科,自由的百科全書 [https://zh.wikipedia.org/wiki/%E5%8D%97%E6%96%B9%E5%A2%A8%E9%BB%9E%E6%B3%95]
- 2. Southern Blotting - an overview [https://www.sciencedirect.com/topics/agricultural-and-biological-sciences/southern-blotting]
- 3. Southern blotting — Knowledge Hub [https://www.genomicseducation.hee.nhs.uk/genotes/knowledge-hub/southern-blotting/]
- 4. Northern和Southern印迹实验方案及简介 [https://www.sigmaaldrich.com/HK/zh/technical-documents/protocol/protein-biology/gel-electrophoresis/southern-and-northern-blotting?srsltid=AfmBOoq-tlxqoHmAXK0OmvmTAd_I13pZO0o4ENFCQJgXYmbnlg7XSoBn]
- 5. Southern Blot实验操作方法 [https://www.zoonbio.com/molecular/southern-blot-protocol.html]
- 6. Southern blot实验方法与步骤详解 [https://www.biomart.cn/lab-web/news/article/31m2h0ego43te.html]
- 7. insights from Southern blotting, qPCR, dPCR and NGS - PMC [https://pmc.ncbi.nlm.nih.gov/articles/PMC11606420/]
- 8. Problem Solved: An Interview with Sir Edwin Southern - PMC [https://pmc.ncbi.nlm.nih.gov/articles/PMC3597496/]
- 9. Southern blot [https://en.wikipedia.org/wiki/Southern_blot]
- 10. What is Western Blotting? The Story of the Western Blot [https://www.biotechniques.com/biochemistry/south-north-east-and-west-ern-the-story-of-how-the-western-blot-came-into-being/]
- 11. Edwin Southern [https://en.wikipedia.org/wiki/Edwin_Southern]
- 12. Southern Blotting Protocol - Conduct ... [https://conductscience.com/southern-blotting-protocol/?srsltid=AfmBOop1VKvdm-huTM-7LwvcZiqryjvqTYT44i-bktuZZTz9Jkle3IRp]
- 13. Southern Blot Analysis Workflow [https://www.thermofisher.com/ca/en/home/life-science/dna-rna-purification-analysis/nucleic-acid-gel-electrophoresis/southern-blotting.html]
- 14. Northern & Southern Blot Protocols [https://www.sigmaaldrich.com/CA/en/technical-documents/protocol/protein-biology/gel-electrophoresis/southern-and-northern-blotting?srsltid=AfmBOooU90R20fgzNKcaES7MIDXpTQdc_IS7MrLaX1nJdntLTxzleZAT]
- 15. Southern Blotting - an overview [https://www.sciencedirect.com/topics/medicine-and-dentistry/southern-blotting]
- 16. Company founder Prof. Sir Edwin Southern [https://www.ogt.com/about-us/company-founder/]
- 17. Southern Blotting Technique - Ask A Biologist [https://askabiologist.asu.edu/southern-blotting]
- 18. Southern Blotting [https://azurebiosystems.com/western-blotting-applications/southern-blotting/]
- 19. Restriction Enzyme in the Real World: 5 Uses You'll ... [https://www.linkedin.com/pulse/restriction-enzyme-real-world-5-uses-youll-actually-mru2e/]
- 20. Southern blot V.1 [https://www.protocols.io/view/southern-blot-c69qzh5w.html]
- 21. Mastering Electrophoresis: Techniques, Equipment, and ... [https://www.labx.com/resources/mastering-electrophoresis-techniques-equipment-and-applications-in-dna-rna-and-protei/5535]
- 22. Agarose gel electrophoresis of DNA: Principles, protocols, ... [https://deepscienceresearch.com/dsr/catalog/book/107/chapter/405]
- 23. Gel Electrophoresis Steps [https://azurebiosystems.com/blog/gel-electrophoresis-steps/]
- 24. Southern blotting: Capillary transfer of DNA to membranes [https://www.nature.com/articles/nmeth1004-91]
- 25. Southern Blot Analysis Workflow [https://www.thermofisher.com/us/en/home/life-science/dna-rna-purification-analysis/nucleic-acid-gel-electrophoresis/southern-blotting.html]
- 26. Universal Southern blot protocol with cold or radioactive ... [https://pmc.ncbi.nlm.nih.gov/articles/PMC10790599/]
- 27. Automated design of genomic Southern blot probes [https://bmcgenomics.biomedcentral.com/articles/10.1186/1471-2164-11-74]
- 28. Southern blotting hybridization [https://bio-protocol.org/exchange/minidetail?id=46205&type=30]
- 29. Northern & Southern Blot Protocols [https://www.sigmaaldrich.com/US/en/technical-documents/protocol/protein-biology/gel-electrophoresis/southern-and-northern-blotting?srsltid=AfmBOoreD7yQAJ3tODZybwwBx7sYhFfyFmOIA0xd2VNS_mCXy7kLsgDk]
- 30. Agarose Gel Electrophoresis for the Separation of DNA ... [https://pmc.ncbi.nlm.nih.gov/articles/PMC4846332/]
- 31. sciencedirect.com/topics/biochemistry-genetics-and-molecular-biology... [https://www.sciencedirect.com/topics/biochemistry-genetics-and-molecular-biology/agarose-gel-electrophoresis]
- 32. How can I separate PCR fragments that are small and very ... [https://www.qiagen.com/us/resources/faq/800]
- 33. Eight Tips to Improve Gel Electrophoresis Results [https://www.thermofisher.com/us/en/home/brands/thermo-scientific/molecular-biology/molecular-biology-learning-center/molecular-biology-resource-library/spotlight-articles/8-DNA-ladder-tips.html]
- 34. Addgene: Protocol - How to Run an Agarose Gel [https://www.addgene.org/protocols/gel-electrophoresis/]
- 35. of PCR... | Thermo Fisher Scientific - IN Agarose Gel Electrophoresis [https://www.thermofisher.com/in/en/home/life-science/dna-rna-purification-analysis/nucleic-acid-gel-electrophoresis/dna-electrophoresis/agarose-gel-electrophoreis/agarose-gel-electrophoresis-protocols-e-gel-ex-agarose-gel-and-ultrapure-agarose.html]
- 36. Nucleic Acid Gel Electrophoresis Troubleshooting [https://www.thermofisher.com/us/en/home/life-science/cloning/cloning-learning-center/invitrogen-school-of-molecular-biology/na-electrophoresis-education/na-electrophoresis-troubleshooting.html]
- 37. Western Blot Transfer Methods [https://www.thermofisher.com/us/en/home/life-science/protein-biology/protein-biology-learning-center/protein-biology-resource-library/pierce-protein-methods/western-blot-transfer-methods.html]
- 38. Western blot transfer techniques [https://www.abcam.com/en-us/knowledge-center/western-blot/western-blot-transfer-methods]
- 39. Fast and accurate quantification of double-strand breaks in ... [https://pmc.ncbi.nlm.nih.gov/articles/PMC12377901/]
- 40. LMDp protocol: Southern blot hybridization [https://www.dmd.nl/protocol/DNAhybridization_ALG005.html]
- 41. Southern Blot: Principles, Example Workflow, & Applications [https://www.aatbio.com/resources/application-notes/southern-blot-principles-example-workflow-applications]
- 42. Southern blotting | PPT [https://www.slideshare.net/slideshow/southern-blotting-73031542/73031542]
- 43. Southern (blot) exposure remains a useful technique [https://bitesizebio.com/25429/southern-blot-exposure-remains-a-useful-technique/]
- 44. Applications of Southern blotting for DNA analysis [https://www.letstalkacademy.com/applications-of-southern-blotting/]
- 45. Universal Southern blot protocol with cold or radioactive ... [https://www.sciencedirect.com/science/article/pii/S1046202320300864]
- 46. Review on the evolution in DNA-based techniques for ... [https://www.sciencedirect.com/science/article/abs/pii/S0026265X24002881]
- 47. SeedSeg: image-based transgenic seed counting for ... [https://plantmethods.biomedcentral.com/articles/10.1186/s13007-025-01406-4]
- 48. Characterization of Transgenic Plants by Southern Blotting ... [https://pubmed.ncbi.nlm.nih.gov/41028421/]
- 49. Southern Blotting Services [https://www.avancebio.com/tecchnology/genomic-services/southern-blot-services/]
- 50. Analysis of DNA by Southern Blotting [https://www.sciencedirect.com/science/article/abs/pii/B9780124186873000057]
- 51. Southern Blot- Definition, Principle, Steps, Results ... [https://microbenotes.com/southern-blot/]
- 52. A sensitive and rapid Southern blot assay based on ... [https://ice-hbv.org/protocol/a-sensitive-and-rapid-southern-blot-assay-based-on-branched-dna-technology-for-the-detection-of-hbv-dna-in-cell-culture-and-liver-tissue-samples/]
- 53. An improved protocol to increase sensitivity of Southern ... [https://www.sciencedirect.com/science/article/abs/pii/S0165022X97000316]
- 54. Southern Blot [https://www.genome.gov/genetics-glossary/Southern-Blot]
- 55. Reduction of background problems in nonradioactive ... [https://pubmed.ncbi.nlm.nih.gov/7685563/]
- 56. Southern vs Northern vs Western Blotting Techniques [https://www.labmanager.com/southern-vs-northern-vs-western-blotting-techniques-854]
- 57. The signal intensity on Southern blots developed by ... [https://pmc.ncbi.nlm.nih.gov/articles/PMC317612/]
- 58. Optimizing Stringency in Wash Buffers for Hybridization Assays [https://www.letstalkacademy.com/increasing-stringency-hybridization-buffers/]
- 59. Blot Hybridization | Thermo Fisher Scientific - US [https://www.thermofisher.com/us/en/home/references/ambion-tech-support/northern-analysis/tech-notes/tools-for-blot-hybridization.html]
- 60. Analysis of DNA by Southern blotting [https://www.qiagen.com/us/knowledge-and-support/knowledge-hub/bench-guide/dna/analysing-dna/analysis-of-dna-by-southern-blotting]
- 61. Automated design of genomic Southern blot probes [https://genes2cognition.org/software/southern_blot/]
- 62. Southern blot analysis/ restriction endonuclease mapping ... [https://www.generi-biotech.com/products/southern-blot-analysis-restriction-endonuclease-mapping-rflp/]
- 63. Northern & Southern Blot Hybridization Detection Services [https://cell.creative-bioarray.com/northern-southern-blot-hybridization-detection-services.html]
- 64. Enhanced accuracy and sensitivity in detecting FMR1 CGG ... [https://pmc.ncbi.nlm.nih.gov/articles/PMC12578688/]
- 65. What are the differences between Northern, Southern and ... [https://www.enzo.com/note/what-are-the-differences-between-northern-southern-and-western-blotting/]
- 66. DNA Sequencing: How to Choose the Right Technology [https://frontlinegenomics.com/dna-sequencing-how-to-choose-the-right-technology/]
- 67. The CST complex mediates a post-resection non- ... [https://www.sciencedirect.com/science/article/pii/S2666979X25002034]
- 68. Southern Blotting Instrument Strategic Insights: Analysis 2025 ... [https://www.archivemarketresearch.com/reports/southern-blotting-instrument-467013]
- 69. Diagnosis of Fragile X Syndrome by Southern Blot Hybridization Using a Chemiluminescent Probe: A Laboratory Protocol | Molecular Diagnosis & Therapy [https://link.springer.com/article/10.1007/BF03262073]
- 70. Clinical Genetic Testing for Fragile X Syndrome by Polymerase Chain Reaction Amplification and Southern Blot Analyses - PubMed [https://pubmed.ncbi.nlm.nih.gov/30900172/]
- 71. Comparison between the polymerase chain reaction ... [https://pubmed.ncbi.nlm.nih.gov/23101592/]
- 72. Diagnosis of Fragile X syndrome by Southern blot hybridization using a chemiluminescent probe: a laboratory protocol - PubMed [https://pubmed.ncbi.nlm.nih.gov/11070151/]
- 73. Simultaneous Detection and Quantification of ... [https://pmc.ncbi.nlm.nih.gov/articles/PMC1867556/]
- 74. Small molecules restore mutant mitochondrial DNA ... [https://www.nature.com/articles/s41586-025-08856-9]